神舟飞天A10平板电脑安装Win8的详细步骤(图文教程)
操作系统 发布日期:2026/7/5 浏览次数:1
正在浏览:神舟飞天A10平板电脑安装Win8的详细步骤(图文教程)
神舟飞天A10安装Win8教程:
注意:重装系统前建议插上USB键盘鼠标,以方便在BIOS进行设置操作。
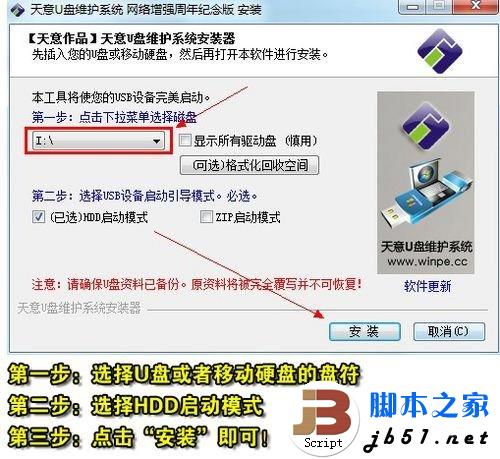
第一步:制作支持WinPE启动的U盘
1、用U盘来安装Win8系统,那就得先让U盘变成支持WinPE启动的超级U盘。推荐两个最常用的WinPE软件,其中通用PE工具箱安装方式多样化,而天意U盘维护系统(天意PE)可以一键制作WinPE启动U盘。

2、请把U盘插入电脑之后,再在Windows系统下运行这两个WinPE软件中的一个。
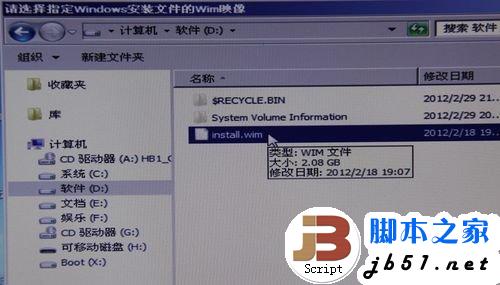
第二步:提取Win8镜像文件中的install.wim到D盘里
1、打开VDM虚拟光驱之后,选择装载,然后选中U盘的Win8镜像文件即可。

2、找到install.wim文件之后,然后复制到D盘根目录下。
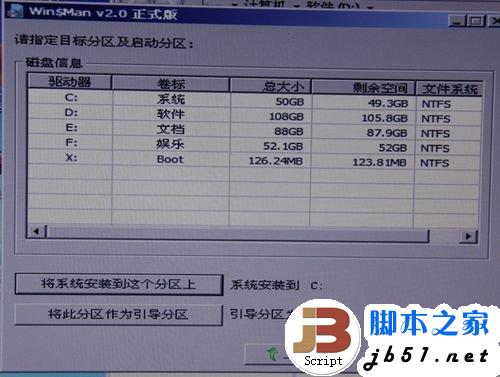
第三步:用Win$Man装Win8
1、打开Win$Man之后,选择D盘上的install.wim之后,选择Windows 8 Customer Preview这个版本(只有一个版本可选)。

2、如果C盘上还没格式化或者有多余的文件(一个文件都不行),Win$Man会提醒用户进行格式化。


3、格式化完毕之后,请选择将系统安装到C盘,引导分区也是C盘。
看不见的Win8安装进程就这样默默开始!

100%之后,Win$Man会提醒用户重启电脑,重启之前记得拔下U盘。
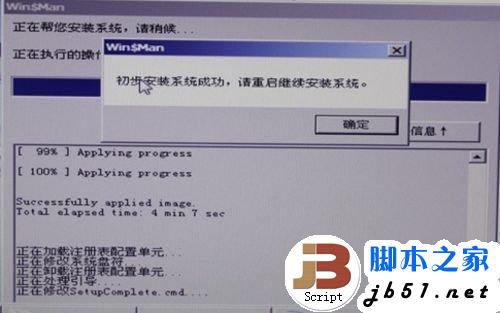
到此,Win8安装可谓完成了99%,剩下能做的只剩下等待,等待电脑重启,等待Win8自动安装了。
顺利进入Windows 8系统后,映入眼帘的便是Win8所主打的Metro UI界面,这也标志着用户已成功安装Windows 8操作系统。
注意:重装系统前建议插上USB键盘鼠标,以方便在BIOS进行设置操作。
第一步:制作支持WinPE启动的U盘
1、用U盘来安装Win8系统,那就得先让U盘变成支持WinPE启动的超级U盘。推荐两个最常用的WinPE软件,其中通用PE工具箱安装方式多样化,而天意U盘维护系统(天意PE)可以一键制作WinPE启动U盘。
2、请把U盘插入电脑之后,再在Windows系统下运行这两个WinPE软件中的一个。
第二步:提取Win8镜像文件中的install.wim到D盘里
1、打开VDM虚拟光驱之后,选择装载,然后选中U盘的Win8镜像文件即可。
2、找到install.wim文件之后,然后复制到D盘根目录下。
第三步:用Win$Man装Win8
1、打开Win$Man之后,选择D盘上的install.wim之后,选择Windows 8 Customer Preview这个版本(只有一个版本可选)。
2、如果C盘上还没格式化或者有多余的文件(一个文件都不行),Win$Man会提醒用户进行格式化。
3、格式化完毕之后,请选择将系统安装到C盘,引导分区也是C盘。
看不见的Win8安装进程就这样默默开始!
100%之后,Win$Man会提醒用户重启电脑,重启之前记得拔下U盘。
到此,Win8安装可谓完成了99%,剩下能做的只剩下等待,等待电脑重启,等待Win8自动安装了。
顺利进入Windows 8系统后,映入眼帘的便是Win8所主打的Metro UI界面,这也标志着用户已成功安装Windows 8操作系统。
上一篇:重装系统的20条原则