Linux oracle 9i图文安装教程四
操作系统 发布日期:2026/5/9 浏览次数:1
正在浏览:Linux oracle 9i图文安装教程四
前期工作:
前面已经讲到了安装Linux系统及加载相应的软件包,参考地址如下:
Linux oracle 9i图文安装教程一(https://www.jb51.net/os/RedHat/9918.html),
Linux oracle 9i图文安装教程二(https://www.jb51.net/os/RedHat/9919.html)
Linux oracle 9i图文安装教程三 (https://www.jb51.net/os/RedHat/9920.html)
这一节将将开始Oracle的安装.其中包括更改Oracle默认的JRE的路径,解决"Error:You do not have sufficient provileges to write to the specified path. in component Database Configuration Assistant 9.2.0.1.0,Installation cannot continue for this component."的错误及安装中必须的步骤. 本节中需在计算机中输入的数据将以蓝色字体标记.
一:下载和解压Oracle软件包,将文件存到"/usr/Oracle"
http://www.oracle.com/technology/software/products/oracle9i/index.html su oracle
gunzip ship_9204_linux_disk1.cpio.gz
gunzip ship_9204_linux_disk2.cpio.gz
gunzip ship_9204_linux_disk3.cpio.gz
cpio -idmv < ship_9204_linux_disk1.cpio
cpio -idmv < ship_9204_linux_disk2.cpio
cpio -idmv < ship_9204_linux_disk3.cpio
二:更改默认的jre路径 su oracle
vi /usr/Oracle/Disk1/install/linux/oraparam.ini
JRE_LOCATION=/usr/jre1.3.1

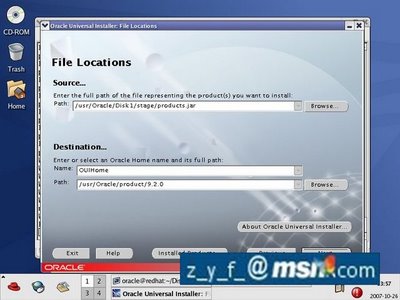
三:开始安装
su oracle
cd /usr/Oracle/Disk1
./runInstaller


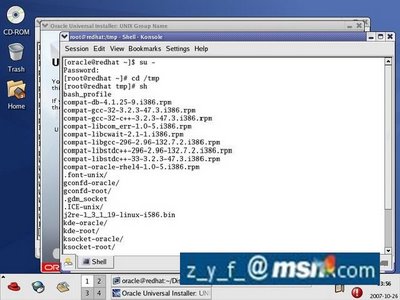
四:进入/tmp运行安装时必须的脚本
su -
cd /tmp
sh orainstRoot.sh


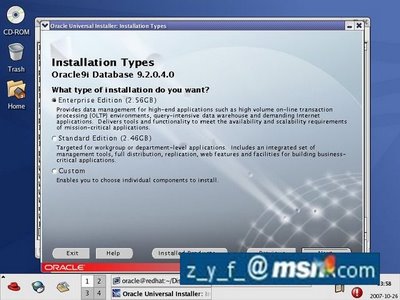
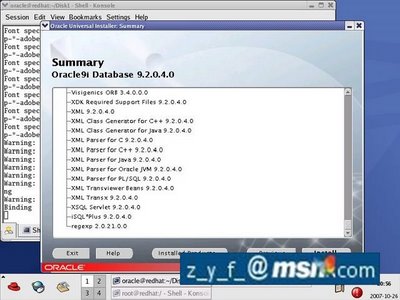
五:继续安装


六:解决下一个画面中可能出现的错误"Error:You do not have sufficient provileges to write to the specified path. in component Database Configuration Assistant 9.2.0.1.0,Installation cannot continue for this component."
su -
cd /
mkdir oradata
chown oracle.dab /oradata

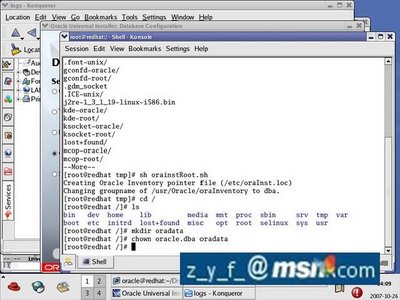


这里有一点不明白,为什么数据库会默认安装在"/oradata"下,不知哪位大侠知道怎样更改这里的设置,还请提示一二.
Linux oracle 9i图文安装教程一(https://www.jb51.net/os/RedHat/9918.html),
Linux oracle 9i图文安装教程二(https://www.jb51.net/os/RedHat/9919.html)
Linux oracle 9i图文安装教程三 (https://www.jb51.net/os/RedHat/9920.html)
Linux oracle 9i图文安装教程四 (https://www.jb51.net/os/RedHat/9921.html)
Linux oracle 9i图文安装教程五 (https://www.jb51.net/os/RedHat/9922.html)
Linux oracle 9i图文安装教程六 (https://www.jb51.net/os/RedHat/9923.html)
前面已经讲到了安装Linux系统及加载相应的软件包,参考地址如下:
Linux oracle 9i图文安装教程一(https://www.jb51.net/os/RedHat/9918.html),
Linux oracle 9i图文安装教程二(https://www.jb51.net/os/RedHat/9919.html)
Linux oracle 9i图文安装教程三 (https://www.jb51.net/os/RedHat/9920.html)
这一节将将开始Oracle的安装.其中包括更改Oracle默认的JRE的路径,解决"Error:You do not have sufficient provileges to write to the specified path. in component Database Configuration Assistant 9.2.0.1.0,Installation cannot continue for this component."的错误及安装中必须的步骤. 本节中需在计算机中输入的数据将以蓝色字体标记.
一:下载和解压Oracle软件包,将文件存到"/usr/Oracle"
http://www.oracle.com/technology/software/products/oracle9i/index.html su oracle
gunzip ship_9204_linux_disk1.cpio.gz
gunzip ship_9204_linux_disk2.cpio.gz
gunzip ship_9204_linux_disk3.cpio.gz
cpio -idmv < ship_9204_linux_disk1.cpio
cpio -idmv < ship_9204_linux_disk2.cpio
cpio -idmv < ship_9204_linux_disk3.cpio
二:更改默认的jre路径 su oracle
vi /usr/Oracle/Disk1/install/linux/oraparam.ini
JRE_LOCATION=/usr/jre1.3.1
三:开始安装
su oracle
cd /usr/Oracle/Disk1
./runInstaller
四:进入/tmp运行安装时必须的脚本
su -
cd /tmp
sh orainstRoot.sh
五:继续安装
六:解决下一个画面中可能出现的错误"Error:You do not have sufficient provileges to write to the specified path. in component Database Configuration Assistant 9.2.0.1.0,Installation cannot continue for this component."
su -
cd /
mkdir oradata
chown oracle.dab /oradata
这里有一点不明白,为什么数据库会默认安装在"/oradata"下,不知哪位大侠知道怎样更改这里的设置,还请提示一二.
Linux oracle 9i图文安装教程一(https://www.jb51.net/os/RedHat/9918.html),
Linux oracle 9i图文安装教程二(https://www.jb51.net/os/RedHat/9919.html)
Linux oracle 9i图文安装教程三 (https://www.jb51.net/os/RedHat/9920.html)
Linux oracle 9i图文安装教程四 (https://www.jb51.net/os/RedHat/9921.html)
Linux oracle 9i图文安装教程五 (https://www.jb51.net/os/RedHat/9922.html)
Linux oracle 9i图文安装教程六 (https://www.jb51.net/os/RedHat/9923.html)