Photoshop将人物图片转为暗黑风格转手绘效果
平面设计 发布日期:2026/4/3 浏览次数:1
正在浏览:Photoshop将人物图片转为暗黑风格转手绘效果
暗黑风格转手绘是转手绘中较难的一种。这种风格的图片整体颜色比较暗沉;不过肤色非常有质感,局部带有一些彩色高光;绘制的时候比较难把控,最好在用色和光影控制方面有一定的经验。
原图

最终效果

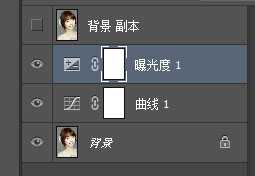
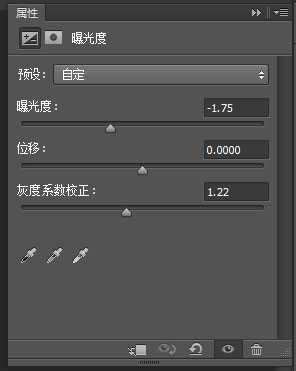
1、调色。将背景复制一层,作为画图的参考。
调色的方法是在【调整】里面,曲线、曝光度、可选颜色、饱和度等等都可以用。我是用曲线把亮度调低,曝光度再降低了,参数如下。最后调整完整个图片比之前暗了很多。


2、滤镜-液化。
目标:眼睛大一点,脸部线条平一点,鼻子嘴的位置修正。
我用的工具只有第一个。画笔压力不要太大。过程中随时根据需要调整画笔大小。快捷键是中括号【】。


上一页12 3 4 5 6 7 8 下一页 阅读全文
原图
最终效果
1、调色。将背景复制一层,作为画图的参考。
调色的方法是在【调整】里面,曲线、曝光度、可选颜色、饱和度等等都可以用。我是用曲线把亮度调低,曝光度再降低了,参数如下。最后调整完整个图片比之前暗了很多。
2、滤镜-液化。
目标:眼睛大一点,脸部线条平一点,鼻子嘴的位置修正。
我用的工具只有第一个。画笔压力不要太大。过程中随时根据需要调整画笔大小。快捷键是中括号【】。
上一页12 3 4 5 6 7 8 下一页 阅读全文