Photoshop为外景美女图片打造甜美的淡调中性绿色
平面设计 发布日期:2026/1/20 浏览次数:1
正在浏览:Photoshop为外景美女图片打造甜美的淡调中性绿色
素材图片背景基本为绿色,调色的时候可以先加强一下主色层次感,然后降低饱和度等得到较为中性的颜色,再把整体调淡一点即可。
原图

最终效果

1、打开素材图片,创建可选颜色调整图层,对黄色进行调整,参数及效果如下图。这一步把图片中的黄色转为橙黄色。

<图1>

<图2>
2、按Ctrl + J 把当前可选颜色调整图层复制一层,效果如下图。

<图3>
3、新建一个图层,按字母键“D”把前,背景颜色恢复到默认的黑白,然后选择菜单:滤镜 > 渲染 > 云彩,确定后把混合模式改为“滤色”,然后添加图层蒙版,用黑白渐变由右上角向左下角拉出白色至黑色线性渐变,效果如下图。

<图4>
4、按Ctrl + J 把当前图层复制一层,把蒙版填充黑色,用白色画笔把右上角部分擦出来,效果如下图。

<图5>
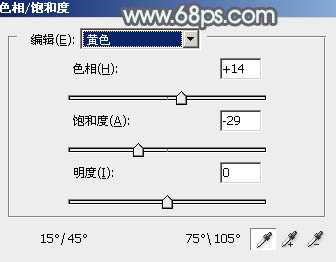
5、创建色相/饱和度调整图层,对黄色,绿色进行调整,参数设置如图6,7,效果如图8。这一步把图片中的黄绿色转为中性色。

<图6>

<图7>

<图8>
6、创建曲线调整图层,对红,蓝通道进行调整,参数设置如图9,10,效果如图11。这一步主要给图片暗部增加蓝色。

<图9>

<图10>

<图11>
7、创建可选颜色调整图层,对红、绿、青,白进行调整,参数设置如图12 - 15,效果如图16。这一步主要给图片增加暖色。

<图12>

<图13>

<图14>

<图15>

<图16>
上一页12 下一页 阅读全文
原图

最终效果

1、打开素材图片,创建可选颜色调整图层,对黄色进行调整,参数及效果如下图。这一步把图片中的黄色转为橙黄色。

<图1>

<图2>
2、按Ctrl + J 把当前可选颜色调整图层复制一层,效果如下图。

<图3>
3、新建一个图层,按字母键“D”把前,背景颜色恢复到默认的黑白,然后选择菜单:滤镜 > 渲染 > 云彩,确定后把混合模式改为“滤色”,然后添加图层蒙版,用黑白渐变由右上角向左下角拉出白色至黑色线性渐变,效果如下图。

<图4>
4、按Ctrl + J 把当前图层复制一层,把蒙版填充黑色,用白色画笔把右上角部分擦出来,效果如下图。

<图5>
5、创建色相/饱和度调整图层,对黄色,绿色进行调整,参数设置如图6,7,效果如图8。这一步把图片中的黄绿色转为中性色。

<图6>

<图7>

<图8>
6、创建曲线调整图层,对红,蓝通道进行调整,参数设置如图9,10,效果如图11。这一步主要给图片暗部增加蓝色。

<图9>

<图10>

<图11>
7、创建可选颜色调整图层,对红、绿、青,白进行调整,参数设置如图12 - 15,效果如图16。这一步主要给图片增加暖色。

<图12>

<图13>

<图14>

<图15>

<图16>
上一页12 下一页 阅读全文