Photoshop为树林静坐的美女调制唯美的淡青色
平面设计 发布日期:2026/1/20 浏览次数:1
正在浏览:Photoshop为树林静坐的美女调制唯美的淡青色
我们需要的主色是青色,调色的时候可以把素材中的绿色都转为青色,暗部则转为青蓝色,然后把整体颜色调淡一点,局部柔化处理即可。
原图

最终效果

1、打开素材图片,创建可选颜色调整图层,对黄,绿色进行调整,参数及效果如下图。这一步把背景部分的绿色转为青绿色。

<图1>

<图2>

<图3>
2、按Ctrl + J 把当前可选颜色调整图层复制一层,不透明度改为:60%,效果如下图。

<图4>
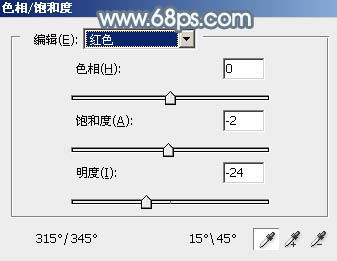
3、创建色相/饱和度调整图层,对全图及红色进行调整,参数设置如图5,6,效果如图7。这一步降低全图及红色饱和度。

<图5>

<图6>

<图7>
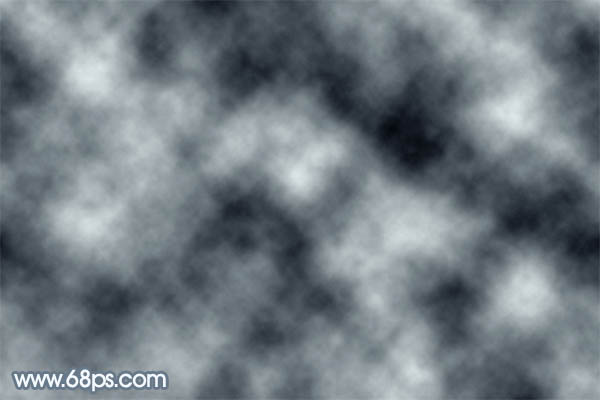
4、新建一个图层,按字母键“D”,把前背景颜色恢复到默认的黑白,然后选择菜单:滤镜 > 渲染 > 云彩,确定后按Ctrl + B 调整一下颜色,增加青蓝色,如下图。

<图8>
5、把云彩图层的混合模式改为“滤色”,不透明度改为:30%,效果如下图。

<图9>
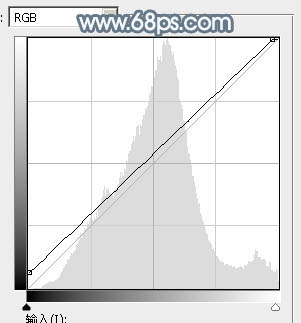
6、创建曲线调整图层,对RGB、绿、蓝通道进行调整,参数设置如图10 - 12,效果如图13。这一步主要给图片高光及暗部增加蓝色。

<图10>

<图11>

<图12>

<图13>
7、创建可选颜色调整图层,对青、白、黑进行调整,参数设置如图14 - 16,效果如图17。这一步主要把图片中的青色调淡。

<图14>

<图15>

<图16>
上一页12 下一页 阅读全文
原图

最终效果

1、打开素材图片,创建可选颜色调整图层,对黄,绿色进行调整,参数及效果如下图。这一步把背景部分的绿色转为青绿色。

<图1>

<图2>

<图3>
2、按Ctrl + J 把当前可选颜色调整图层复制一层,不透明度改为:60%,效果如下图。

<图4>
3、创建色相/饱和度调整图层,对全图及红色进行调整,参数设置如图5,6,效果如图7。这一步降低全图及红色饱和度。

<图5>

<图6>

<图7>
4、新建一个图层,按字母键“D”,把前背景颜色恢复到默认的黑白,然后选择菜单:滤镜 > 渲染 > 云彩,确定后按Ctrl + B 调整一下颜色,增加青蓝色,如下图。

<图8>
5、把云彩图层的混合模式改为“滤色”,不透明度改为:30%,效果如下图。

<图9>
6、创建曲线调整图层,对RGB、绿、蓝通道进行调整,参数设置如图10 - 12,效果如图13。这一步主要给图片高光及暗部增加蓝色。

<图10>

<图11>

<图12>

<图13>
7、创建可选颜色调整图层,对青、白、黑进行调整,参数设置如图14 - 16,效果如图17。这一步主要把图片中的青色调淡。

<图14>

<图15>

<图16>
上一页12 下一页 阅读全文