Photoshop为静物水杯加上日系泛白的青色
平面设计 发布日期:2026/6/20 浏览次数:1
正在浏览:Photoshop为静物水杯加上日系泛白的青色
效果图的色调非常独特,看上去也非常舒服。作者调色过程:先加强图片的明暗对比修饰好细节,然后用调色工具及色彩叠加渲染出基色,最后整体润色即可。
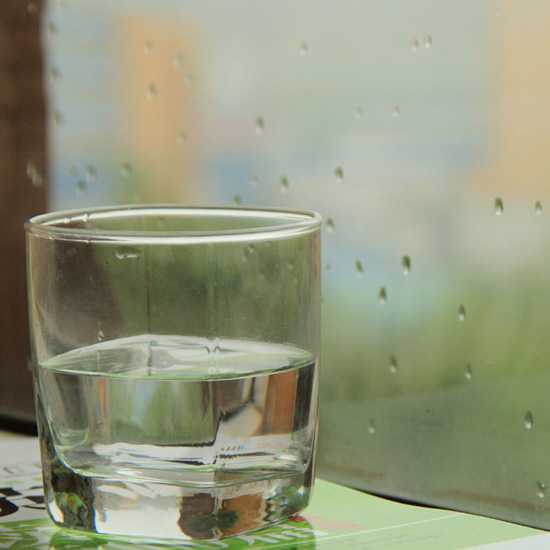
原图
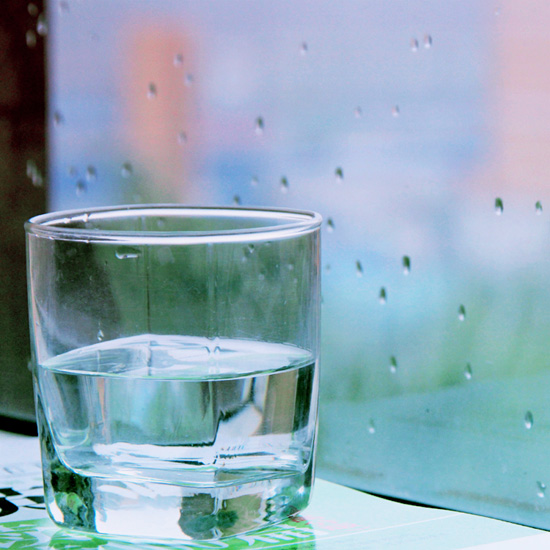
最终效果
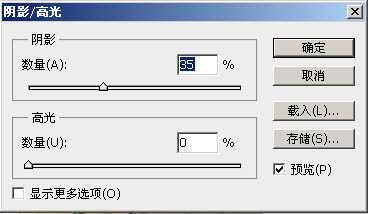
1、打开素材复制图层,创建阴影/高光调整图层,参数:阴影35%。
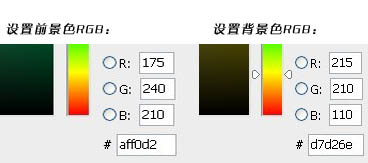
2、设置前景色和背景色。
3、新建填充图层,参数为:渐变、角度-90,反向,缩放100。
4、设置填充图层属性为柔光,不透明度为80%。

5、复制该填充层,图层属性设置为叠加,不透明度为30%。
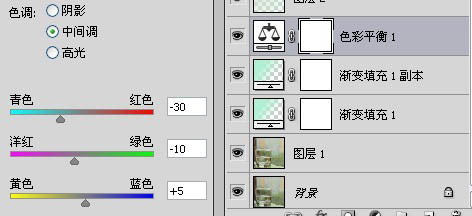
6、新建色彩平衡,参数如下。
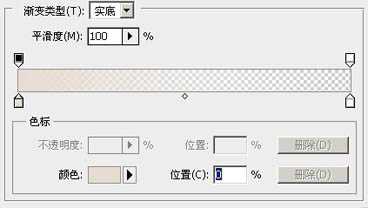
7、新建渐变填充图层:参数为:径向渐变、角度90、缩放150%,注意这里用鼠标点击渐变色设置,然后点击左边色块,设置左边色标颜色为红色230、绿色220、蓝色210,右边色标为红色175、绿色240、蓝色210,最后设置图层属性为正片叠底,不透明度40。
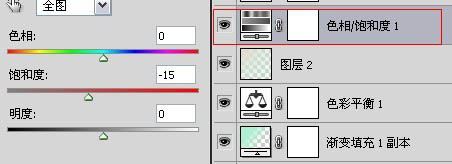
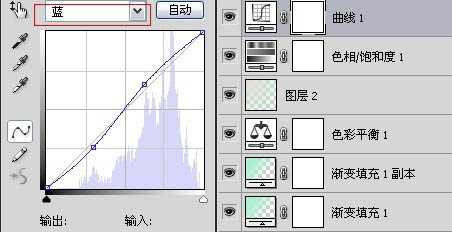
8、新建色彩饱和度调整层,设置饱和度为-15,新建曲线图层。参数为:蓝色通道添加节点1为65、75,节点2为170、160。
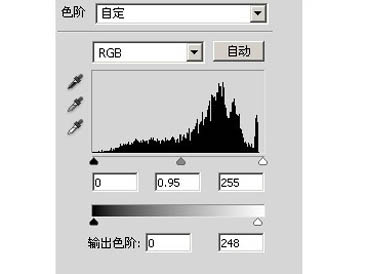
9、新建色阶,参数如下。
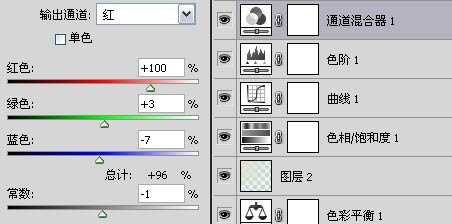
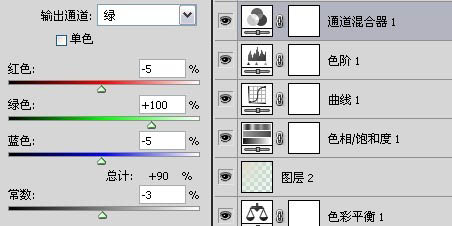
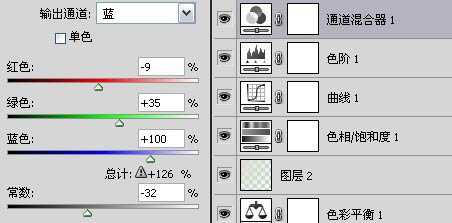
10、新建通道混合器,参数如下。
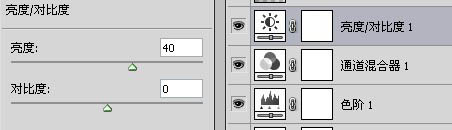
11、新建亮度调整,设置亮度为40。
12、新建渐变填充层,图层属性为叠加,不透明度10%参数为:径向渐变、角度90°,前景色白色,背景色黑色
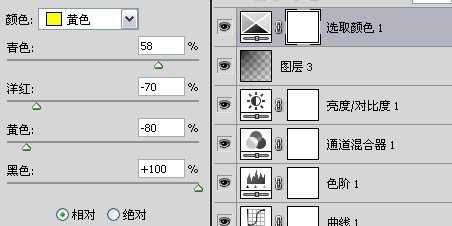
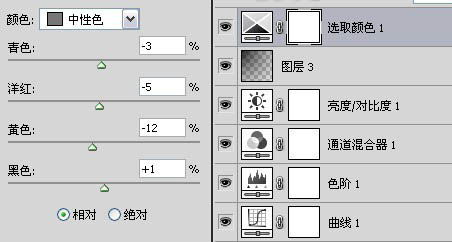
13、新建可选颜色,对黄色和中性色进行调整,数值如下。
最后在整体提亮,亮度设置为20。最终效果就出来啦。

原图
最终效果
1、打开素材复制图层,创建阴影/高光调整图层,参数:阴影35%。
2、设置前景色和背景色。
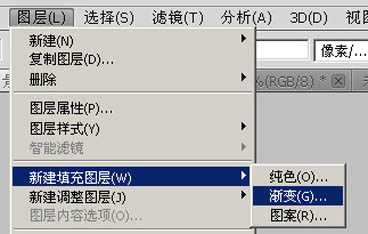
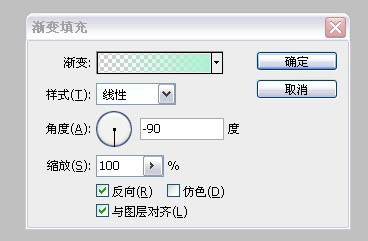
3、新建填充图层,参数为:渐变、角度-90,反向,缩放100。
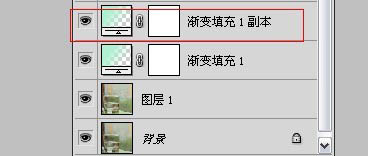
4、设置填充图层属性为柔光,不透明度为80%。
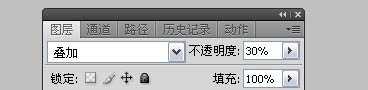
5、复制该填充层,图层属性设置为叠加,不透明度为30%。
6、新建色彩平衡,参数如下。
7、新建渐变填充图层:参数为:径向渐变、角度90、缩放150%,注意这里用鼠标点击渐变色设置,然后点击左边色块,设置左边色标颜色为红色230、绿色220、蓝色210,右边色标为红色175、绿色240、蓝色210,最后设置图层属性为正片叠底,不透明度40。
8、新建色彩饱和度调整层,设置饱和度为-15,新建曲线图层。参数为:蓝色通道添加节点1为65、75,节点2为170、160。
9、新建色阶,参数如下。
10、新建通道混合器,参数如下。
11、新建亮度调整,设置亮度为40。
12、新建渐变填充层,图层属性为叠加,不透明度10%参数为:径向渐变、角度90°,前景色白色,背景色黑色
13、新建可选颜色,对黄色和中性色进行调整,数值如下。
最后在整体提亮,亮度设置为20。最终效果就出来啦。
上一篇:PS打造出云端间透射出来的光束