Photoshop快速制作漂亮的金黄色玫瑰花
平面设计 发布日期:2026/6/18 浏览次数:1
正在浏览:Photoshop快速制作漂亮的金黄色玫瑰花
原图

最终效果

1、打开原图,ctrl+j得到图层1。
2、新建调整图层——渐变映射,得到渐变映射图层1,选择黑色、白色。
3、alt+ctrl+shift+e盖印图层,得到图层2。
4、新建调整图层——亮度/对比度,得到亮度/对比度图层1,参数如图。

5、新建调整图层——渐变映射,得到渐变映射图层2,如图,黄色#ecac00,白色默认。

6、将渐变映射2的图层模式改为“颜色减淡”,不透明度降为“90%”。
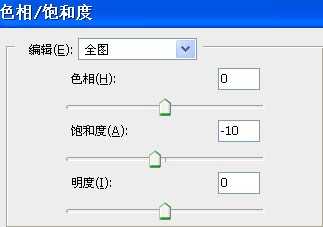
7、新建调整图层——色相,得到色相图层1 ,参数如图。
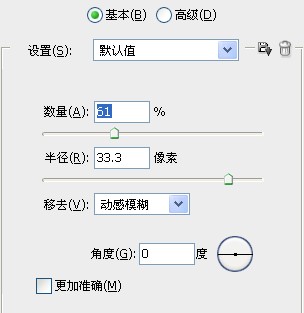
8、alt+ctrl+shift+e得到图层3,执行滤镜——锐化——智能锐化,参数如图。
最终效果:

最终效果
1、打开原图,ctrl+j得到图层1。
2、新建调整图层——渐变映射,得到渐变映射图层1,选择黑色、白色。
3、alt+ctrl+shift+e盖印图层,得到图层2。
4、新建调整图层——亮度/对比度,得到亮度/对比度图层1,参数如图。
5、新建调整图层——渐变映射,得到渐变映射图层2,如图,黄色#ecac00,白色默认。
6、将渐变映射2的图层模式改为“颜色减淡”,不透明度降为“90%”。
7、新建调整图层——色相,得到色相图层1 ,参数如图。
8、alt+ctrl+shift+e得到图层3,执行滤镜——锐化——智能锐化,参数如图。
最终效果: