Photoshop制作科幻效果的雾化美女
平面设计 发布日期:2026/7/2 浏览次数:1
正在浏览:Photoshop制作科幻效果的雾化美女
原图

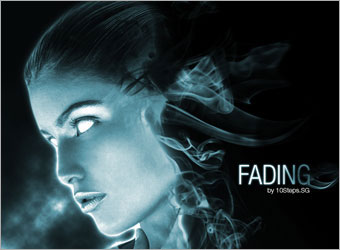
最终效果
1、首先我们要下载一个烟雾的photoshop笔刷,没有的可以去网上下载。然后在photoshop中打开美女素材并载入烟雾笔刷,如图所示。
2、创建一个新图片,大小为750px*550px,然后使用渐变工具在背景图层中填充一个颜色#2B2B2B到颜色#000000的线性渐变,如图所示。

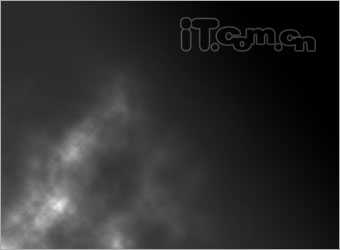
3、创建一个新图层,设置背景色为#000000背景色为#FFFFFF,然后执行“滤镜—渲染—云彩”,设置图层混合模式为颜色减淡,接着使用柔角的橡皮擦工具云彩上右上角部分,如图所示。
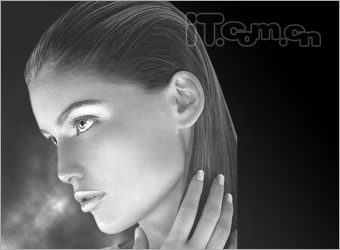
4、打开美女素材,使用钢笔工具把美女的头像抠出来粘贴到图片中,如图所示。
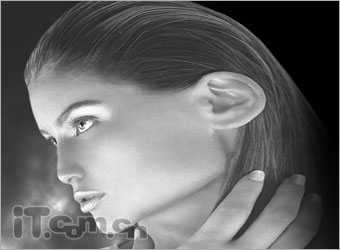
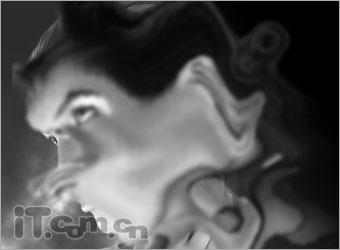
5、按下Ctrl+J复制美女图层,使用矩形选框工具选择美女头像眼睛以右的半面,然后按下Ctrl+T进入自由变换状态,拉伸美女脸。接着使用较大的橡皮擦工具淡化拉伸面部的右侧,如图所示。
6、选择“滤镜—扭曲—波纹”,设置生成器数:5,正弦,波长最小:10,波长最大:120,振幅最小:5,振幅最大:35,比例都设置为100%,选择“重复边缘像素”选项,效果如图所示。
上一页12 下一页 阅读全文
最终效果
1、首先我们要下载一个烟雾的photoshop笔刷,没有的可以去网上下载。然后在photoshop中打开美女素材并载入烟雾笔刷,如图所示。
2、创建一个新图片,大小为750px*550px,然后使用渐变工具在背景图层中填充一个颜色#2B2B2B到颜色#000000的线性渐变,如图所示。
3、创建一个新图层,设置背景色为#000000背景色为#FFFFFF,然后执行“滤镜—渲染—云彩”,设置图层混合模式为颜色减淡,接着使用柔角的橡皮擦工具云彩上右上角部分,如图所示。
4、打开美女素材,使用钢笔工具把美女的头像抠出来粘贴到图片中,如图所示。
5、按下Ctrl+J复制美女图层,使用矩形选框工具选择美女头像眼睛以右的半面,然后按下Ctrl+T进入自由变换状态,拉伸美女脸。接着使用较大的橡皮擦工具淡化拉伸面部的右侧,如图所示。
6、选择“滤镜—扭曲—波纹”,设置生成器数:5,正弦,波长最小:10,波长最大:120,振幅最小:5,振幅最大:35,比例都设置为100%,选择“重复边缘像素”选项,效果如图所示。
上一页12 下一页 阅读全文