ps下非常完美的人物头像转手绘效果
平面设计 发布日期:2026/5/27 浏览次数:1
正在浏览:ps下非常完美的人物头像转手绘效果
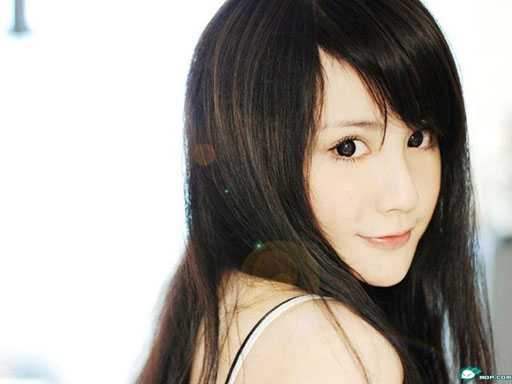
原图
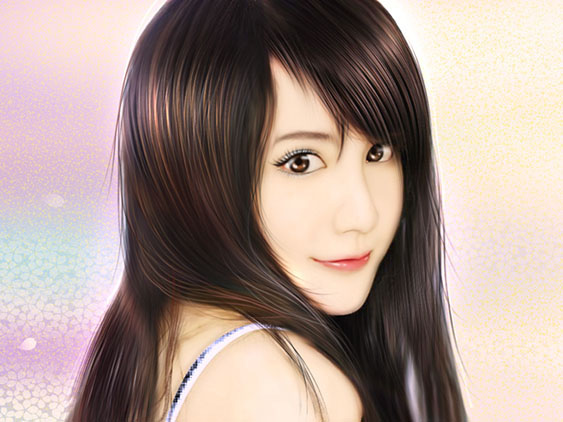
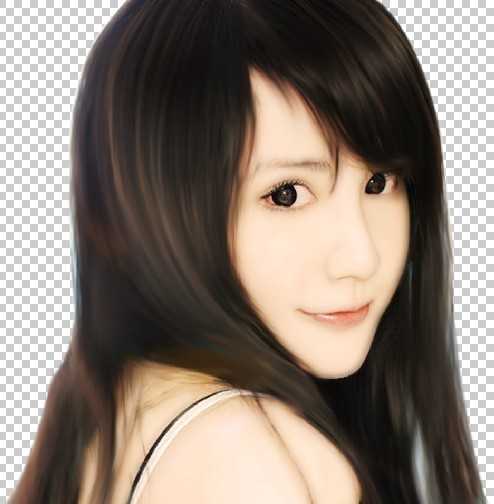
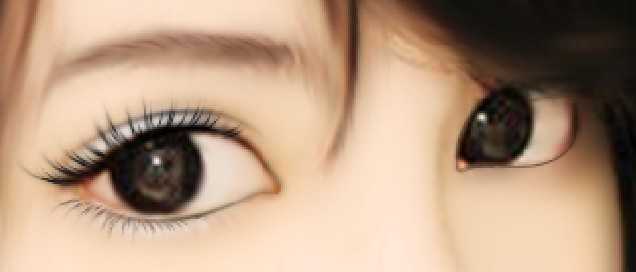
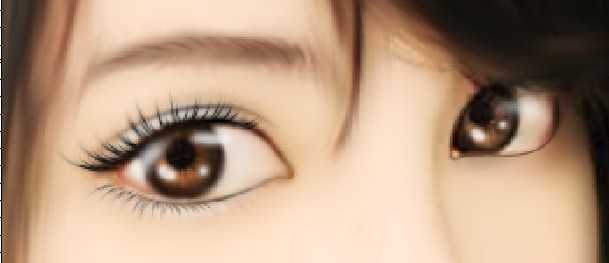
最终效果
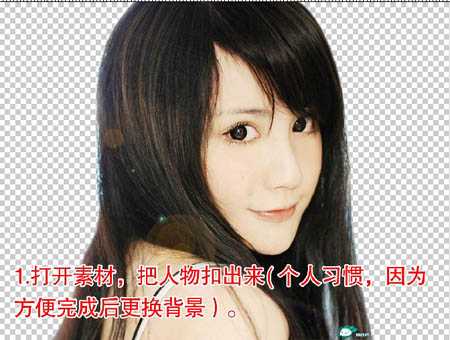
1、打开原图素材,把人物部分抠出来,方法任选。大致效果如下图。
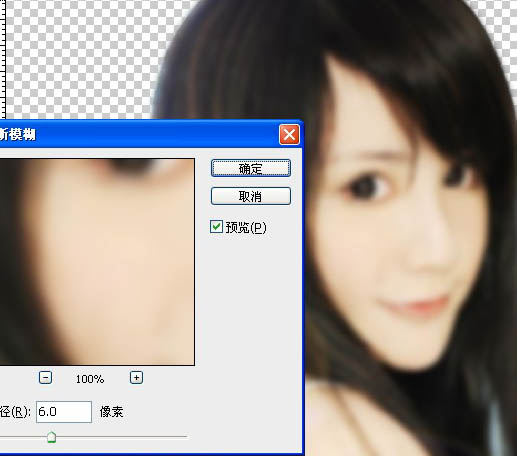
2、Ctrl + J 把抠出的人物图层复制一层,执行滤镜→模糊→高斯模糊(参数如下),参数要根据不同的图来设定。
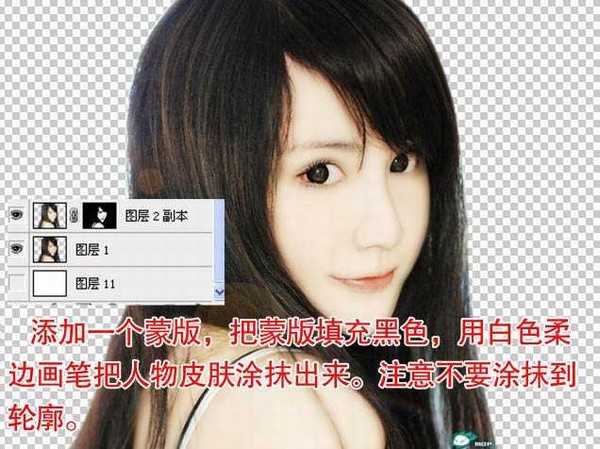
3、添加图层蒙版,把蒙版填充黑色,用白色柔边画笔把人物皮肤涂抹出来,注意不要涂抹到轮廓。
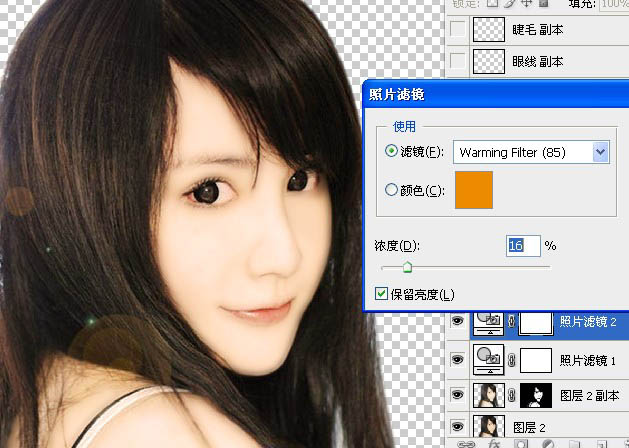
4、创建照片滤镜调整图层,参数设置如下图。
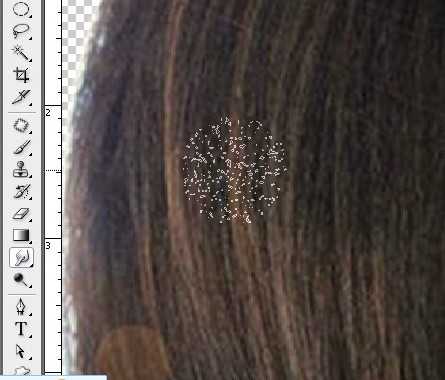
5、新建一个图层,按Ctrl + Alt + Shift + E 盖印图层,选择涂抹工具:我用的是100号画笔(反正就是不规则的画笔)用其他的也行。把涂抹压力设置为80-100左右。
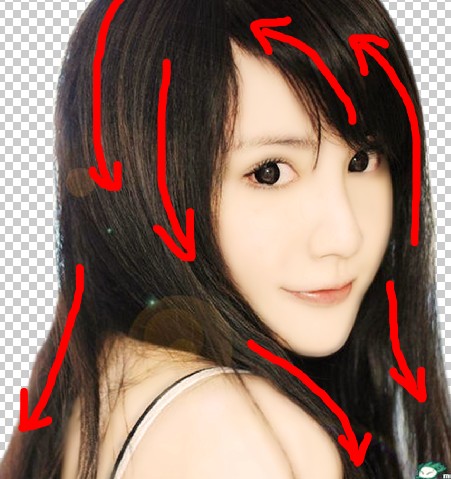
6、顺着发丝走向涂抹,记住:(一定要认真,任何好的作品,不认真是不行的)
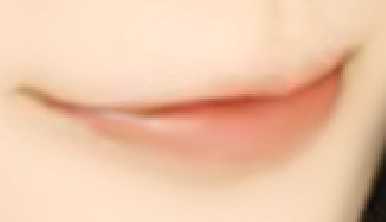
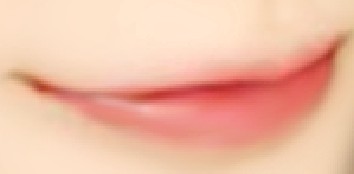
7、然后用柔边画笔涂抹嘴唇,按照嘴唇的走向涂抹,不要涂抹到轮廓(注意,和刚才的画笔不一样,刚才那个是不规则的,现在这个是柔边画笔,就是边缘有点模糊的那种圆形画笔)
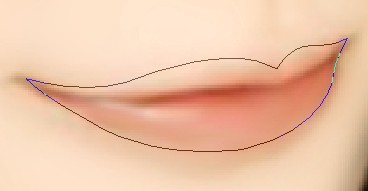
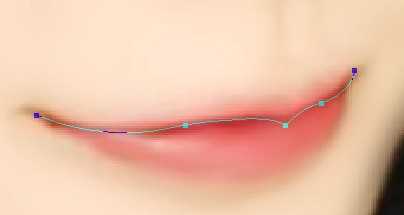
8、用钢笔工具,把嘴唇轮廓勾勒出来:
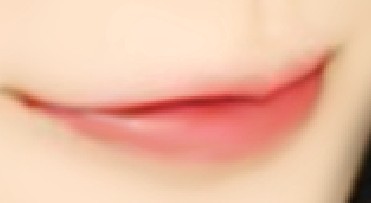
9、成选区后,羽化3个像素后,ctrl+B调整下嘴唇的颜色:(嘴唇颜色自己觉得好看就行了)

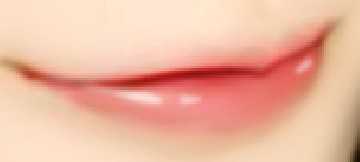
10、用钢笔工具勾勒出唇中线的轮廓:
11、用4-5像素的圆形柔边画笔描边路径(勾选模拟压力),把图层混合模式改为“叠加”,适当调整透明度,效果如下:
12、用白色柔边画笔画一点点嘴唇高光,可自己调整高光形状。然后适当调整透明度。效果如下:
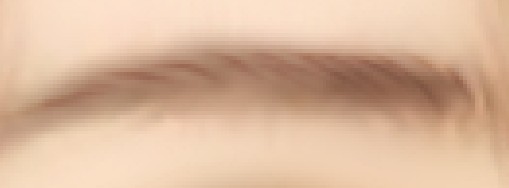
13、嘴唇的其他细节,用模糊工具和涂抹工具(仿制图章工具)再处理一下就OK了,嘴角用加深工具适当加深点(根据个人喜好)。 眉毛部分,用柔边画笔画一条眉毛,然后用变形工具调整下眉毛的弧度。眉毛颜色自选,然后用橡皮工具擦去不要的部分。
14、画出眉毛的路径,用深色画笔填充路径(勾选模拟压力),擦去不要的部分,如果觉得不够,还可以复制几次。
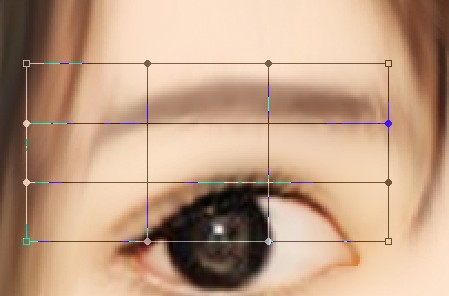
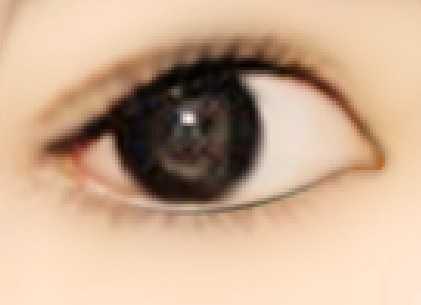
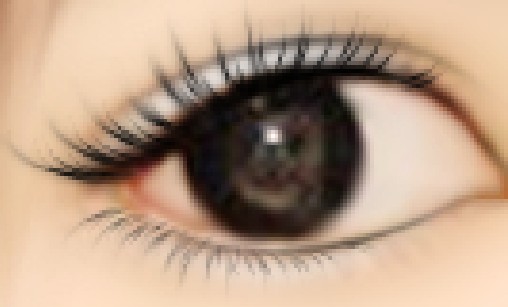
15、眉毛完成后,就到眼睛:先用加深工具把上眼帘的睫毛处加深。用涂抹工具把眼白弄白点,效果如下;

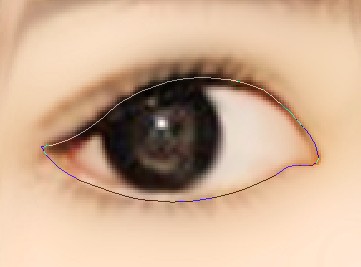
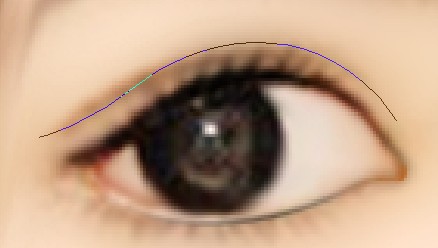
16、然后用钢笔工具勾勒出眼睛的轮廓:
17、用黑色柔边画笔填充路径(这一步可以不勾选模拟压力,然后把不需要的地方用橡皮工具擦掉),效果如下:
18、用钢笔工具勾勒出双眼皮:
19、然后用画笔填充路径(勾选模拟压力)。效果如下:
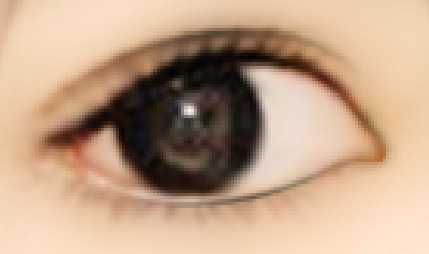
20、用白色的画笔画出眼影,然后再用模糊工具模糊下:效果如下:

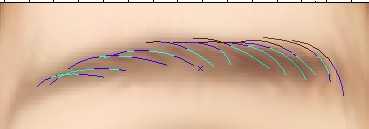
21、接下来就是绘制睫毛,用钢笔工具勾勒出睫毛的走向(如果实在不会勾勒,也可以自己下睫毛笔刷):如图。
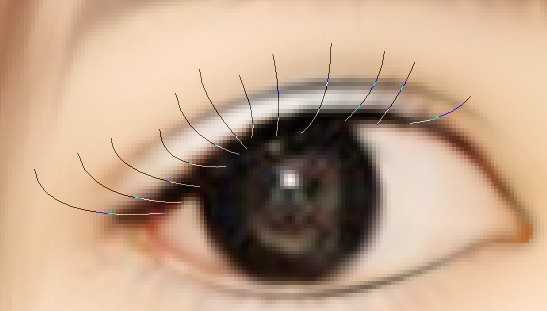
22、用1到2像素的画笔填充路径(勾选模拟压力),如图:
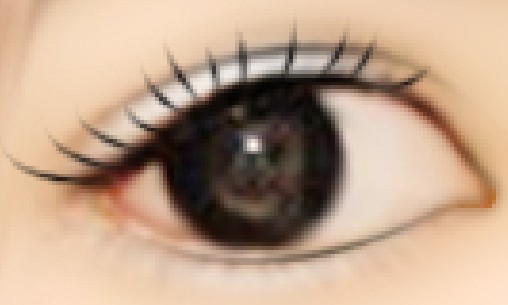
23、睫毛看起来不够多,因此再复制几层,一般2到3次就行了,效果如下:
24、下面的睫毛比上面的睫毛少一点,所以我偷懒,把上面的睫毛复制到下面,改变下透明度就可以了。
25、右边的眼睛我只画了眼线,因为没有睫毛(当然眼白也要处理一下)
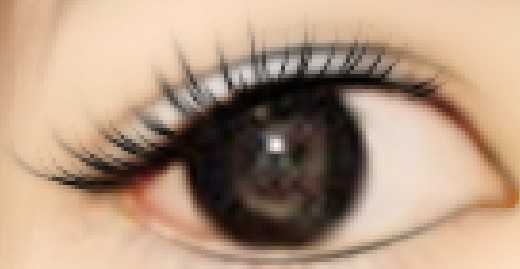
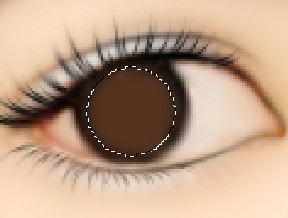
26、接下来就是眼珠了:由于主角的黑眼珠比较完整,所以我直接画虹膜了。用圆形工具画一个圆形,羽化3个像素,填充棕色(按个人喜好,你喜欢什么颜色就填充什么颜色,个人比较喜欢棕色)
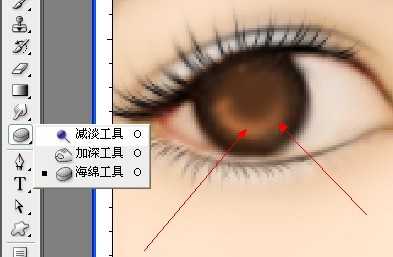
27、用简单工具轻轻的在棕色上擦几下,擦出高光,别太过,效果如图:
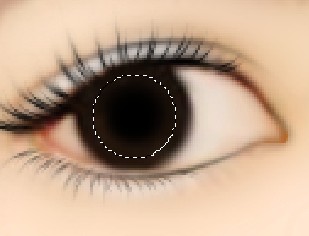
28、然后再画一个圆形,填充黑色:
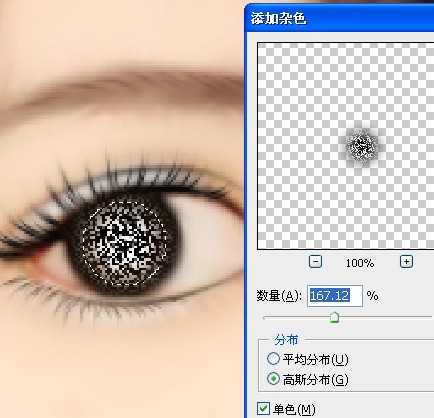
29、然后,选择,滤镜→杂色→添加杂色,参数如下:
30、不要取消选区,选择:滤镜→模糊→径向模糊,设置如下:
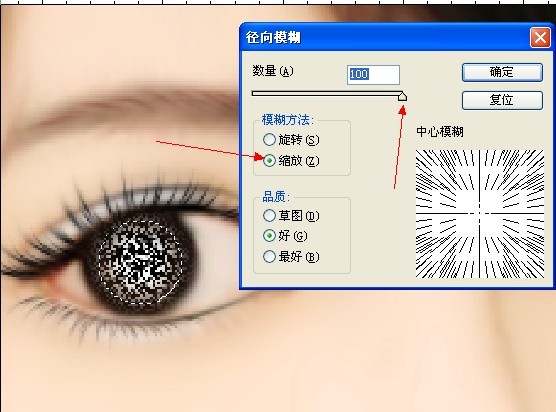
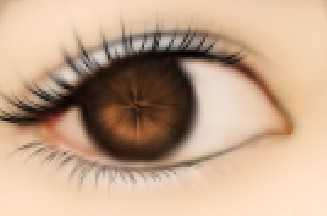
31、径向模糊执行3次后,把混合模式改为“叠加”,效果如下:
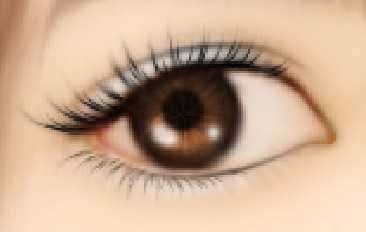
32、然后再画一个圆形做瞳孔,适当羽化下:

33、然后在瞳孔下面用柔边画笔绘制两个高光:
34、接着再用柔边画笔在瞳孔上绘制两个不规则的高光,用橡皮擦去不需要的地方:

35、右边的眼珠也用同样的方法绘制,效果图如下:
36、脸部效果基本完毕,一些细节,还是要自己耐心处理,总之,要达到自己比较满意的效果:
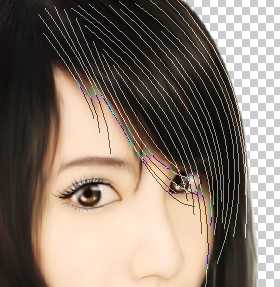
37、接下来就是头发了,用钢笔顺着头发的走向把头发的路径勾勒出来:
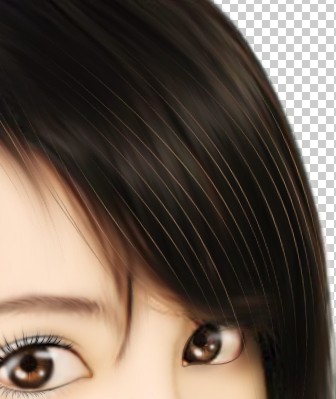
38、选择1-2像素的实心画笔,填充路径(勾选模拟压力),颜色自选(这里我选的是浅棕色):
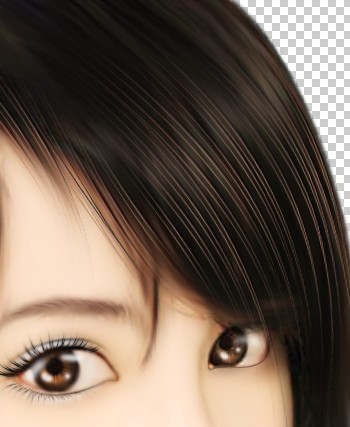
39、为了表现头发的层次感,再次复制:

40、再次复制,这次用个黑色,用其他颜色也可以,看自己喜欢(我比较懒):
上一页12 下一页 阅读全文
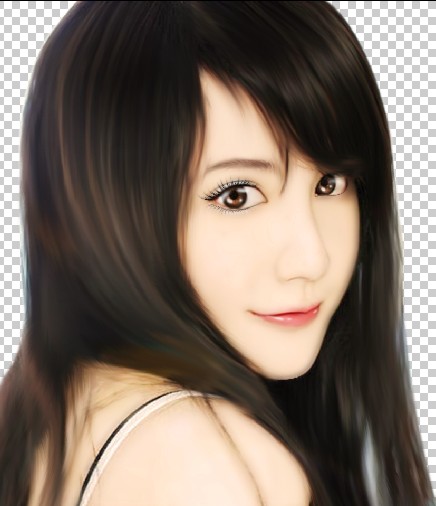
最终效果
1、打开原图素材,把人物部分抠出来,方法任选。大致效果如下图。
2、Ctrl + J 把抠出的人物图层复制一层,执行滤镜→模糊→高斯模糊(参数如下),参数要根据不同的图来设定。
3、添加图层蒙版,把蒙版填充黑色,用白色柔边画笔把人物皮肤涂抹出来,注意不要涂抹到轮廓。
4、创建照片滤镜调整图层,参数设置如下图。
5、新建一个图层,按Ctrl + Alt + Shift + E 盖印图层,选择涂抹工具:我用的是100号画笔(反正就是不规则的画笔)用其他的也行。把涂抹压力设置为80-100左右。
6、顺着发丝走向涂抹,记住:(一定要认真,任何好的作品,不认真是不行的)
7、然后用柔边画笔涂抹嘴唇,按照嘴唇的走向涂抹,不要涂抹到轮廓(注意,和刚才的画笔不一样,刚才那个是不规则的,现在这个是柔边画笔,就是边缘有点模糊的那种圆形画笔)
8、用钢笔工具,把嘴唇轮廓勾勒出来:
9、成选区后,羽化3个像素后,ctrl+B调整下嘴唇的颜色:(嘴唇颜色自己觉得好看就行了)
10、用钢笔工具勾勒出唇中线的轮廓:
11、用4-5像素的圆形柔边画笔描边路径(勾选模拟压力),把图层混合模式改为“叠加”,适当调整透明度,效果如下:
12、用白色柔边画笔画一点点嘴唇高光,可自己调整高光形状。然后适当调整透明度。效果如下:
13、嘴唇的其他细节,用模糊工具和涂抹工具(仿制图章工具)再处理一下就OK了,嘴角用加深工具适当加深点(根据个人喜好)。 眉毛部分,用柔边画笔画一条眉毛,然后用变形工具调整下眉毛的弧度。眉毛颜色自选,然后用橡皮工具擦去不要的部分。
14、画出眉毛的路径,用深色画笔填充路径(勾选模拟压力),擦去不要的部分,如果觉得不够,还可以复制几次。
15、眉毛完成后,就到眼睛:先用加深工具把上眼帘的睫毛处加深。用涂抹工具把眼白弄白点,效果如下;
16、然后用钢笔工具勾勒出眼睛的轮廓:
17、用黑色柔边画笔填充路径(这一步可以不勾选模拟压力,然后把不需要的地方用橡皮工具擦掉),效果如下:
18、用钢笔工具勾勒出双眼皮:
19、然后用画笔填充路径(勾选模拟压力)。效果如下:
20、用白色的画笔画出眼影,然后再用模糊工具模糊下:效果如下:
21、接下来就是绘制睫毛,用钢笔工具勾勒出睫毛的走向(如果实在不会勾勒,也可以自己下睫毛笔刷):如图。
22、用1到2像素的画笔填充路径(勾选模拟压力),如图:
23、睫毛看起来不够多,因此再复制几层,一般2到3次就行了,效果如下:
24、下面的睫毛比上面的睫毛少一点,所以我偷懒,把上面的睫毛复制到下面,改变下透明度就可以了。
25、右边的眼睛我只画了眼线,因为没有睫毛(当然眼白也要处理一下)
26、接下来就是眼珠了:由于主角的黑眼珠比较完整,所以我直接画虹膜了。用圆形工具画一个圆形,羽化3个像素,填充棕色(按个人喜好,你喜欢什么颜色就填充什么颜色,个人比较喜欢棕色)
27、用简单工具轻轻的在棕色上擦几下,擦出高光,别太过,效果如图:
28、然后再画一个圆形,填充黑色:
29、然后,选择,滤镜→杂色→添加杂色,参数如下:
30、不要取消选区,选择:滤镜→模糊→径向模糊,设置如下:
31、径向模糊执行3次后,把混合模式改为“叠加”,效果如下:
32、然后再画一个圆形做瞳孔,适当羽化下:
33、然后在瞳孔下面用柔边画笔绘制两个高光:
34、接着再用柔边画笔在瞳孔上绘制两个不规则的高光,用橡皮擦去不需要的地方:
35、右边的眼珠也用同样的方法绘制,效果图如下:
36、脸部效果基本完毕,一些细节,还是要自己耐心处理,总之,要达到自己比较满意的效果:
37、接下来就是头发了,用钢笔顺着头发的走向把头发的路径勾勒出来:
38、选择1-2像素的实心画笔,填充路径(勾选模拟压力),颜色自选(这里我选的是浅棕色):
39、为了表现头发的层次感,再次复制:
40、再次复制,这次用个黑色,用其他颜色也可以,看自己喜欢(我比较懒):
上一页12 下一页 阅读全文