ps 利用通道及色彩范围快速抠出透明的纱帐
平面设计 发布日期:2026/6/30 浏览次数:1
正在浏览:ps 利用通道及色彩范围快速抠出透明的纱帐
大致过程:打开原图素材后,我们进入通道面板,选择物体最为明显的通道并复制,用调色工具对复制的通道稍微调整明暗及对比度,再用色彩范围直接选出物体选区,有了选区我们就可以直接把物体复制到新的图层,后期适当调整一下细节即可。
原图

最终效果

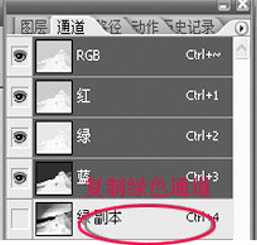
1、先用PS将照片素材打开,点击来到通道面板下,右击复制绿色通道,得到绿副本通道。
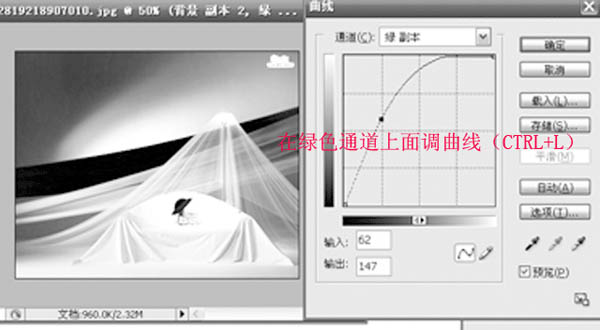
2、选中绿副本通道,并执行快捷键CTRL+M打开曲线调整面板,分别将输入和输出设为62和147。
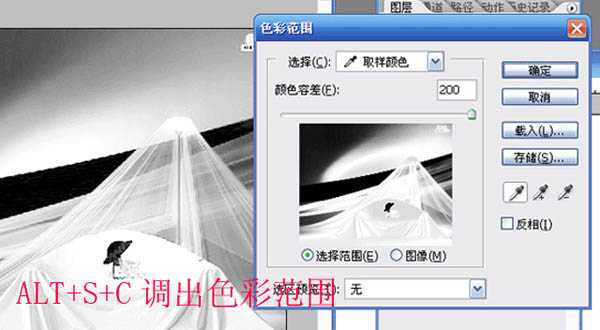
3、执行菜单栏上的选择-色彩范围命令,在色彩范围面板上进行参数设置,颜色容差设置最大,然后用吸管点纱巾部分。
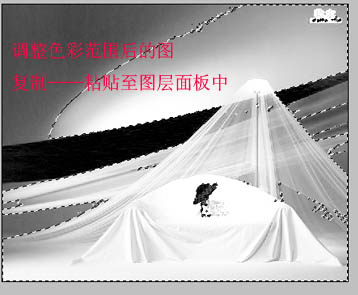
4、色彩范围确定后,得到选区,按Ctrl + C复制选区内容,并将其它粘贴到图层面板中。
5、到这一步时修出多余的部分已经是很简单了,之后调整它的色相/饱和度,再添加自己喜欢的背景图案就OK了。

最终效果:
原图
最终效果
1、先用PS将照片素材打开,点击来到通道面板下,右击复制绿色通道,得到绿副本通道。
2、选中绿副本通道,并执行快捷键CTRL+M打开曲线调整面板,分别将输入和输出设为62和147。
3、执行菜单栏上的选择-色彩范围命令,在色彩范围面板上进行参数设置,颜色容差设置最大,然后用吸管点纱巾部分。
4、色彩范围确定后,得到选区,按Ctrl + C复制选区内容,并将其它粘贴到图层面板中。
5、到这一步时修出多余的部分已经是很简单了,之后调整它的色相/饱和度,再添加自己喜欢的背景图案就OK了。
最终效果:
上一篇:Phototune 滤镜实例教程
下一篇:ps为美女写真照片调出通透黄色调