Photoshop设计制作简洁的蓝色抽丝立体字
平面设计 发布日期:2026/4/20 浏览次数:1
正在浏览:Photoshop设计制作简洁的蓝色抽丝立体字
效果字制作比较简单,主要由两部分构成:表面字及立体面。表面字用图层样式及抽丝图案来完成;立体面直接按规律复制文字,并加上颜色和投影即可
最终效果

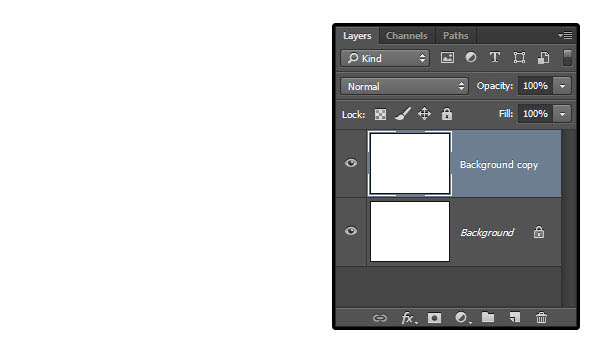
1、新建一个800*600px文档,并将Background图层创建一个副本,将其命名为Background_copy。
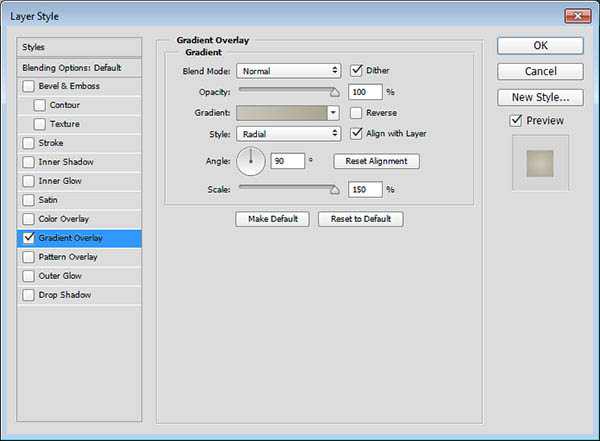
2、双击Background_copy图层,勾选渐变叠加,并设定以下数值 勾选仿色复选框;样式:径向;缩放:150%;创建渐变,左边颜色为#c8c5b8,右边颜色为#aaa593。

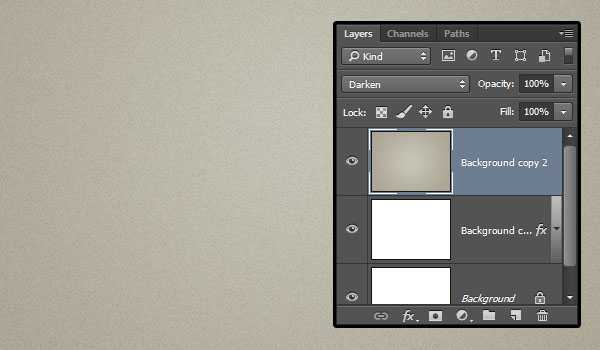
3、将Background_copy图层创建一个副本,然后栅格化该图层,并命名为Background_copy_2。 如果你使用的Photoshop为CS6或者更早的版本,你需要点击图层编组(图层)图层编组),然后合并该组(图层)合并组)来代替。
设定前景色为#c8c5b8,背景色为#aaa593。

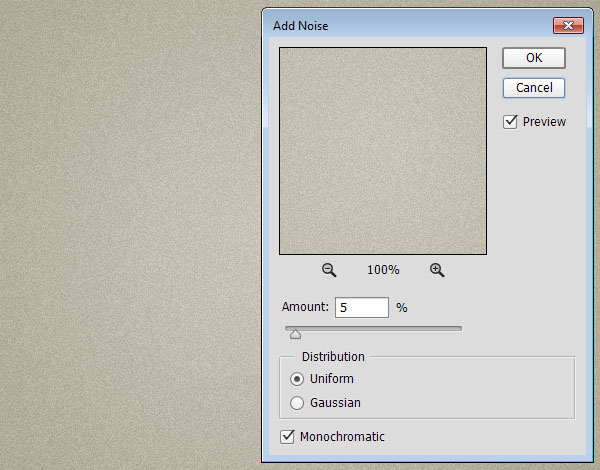
4、点击滤镜 〉杂色 〉添加杂色,调节数量为5,分布模式为平均分布,勾选单色复选框。
5、将Background_copy_2图层的混合模式改为变暗,这将为增强杂色在背景中的效果。
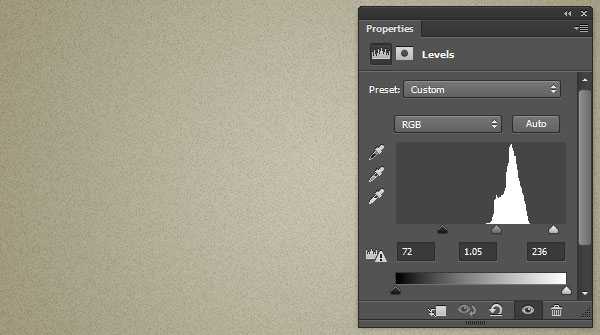
6、点击图层面板底部的创建新的填充或调整图层按钮,并选择色阶。
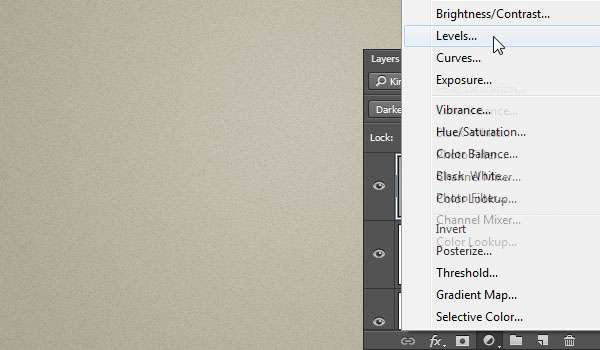
7、调整阴影值为72、伽玛值为1.05、高光为236,这将调节背景图层的着色。
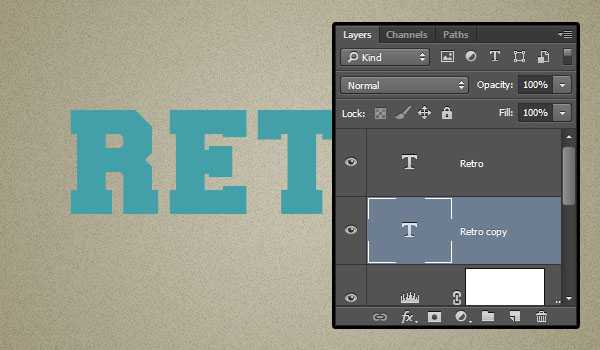
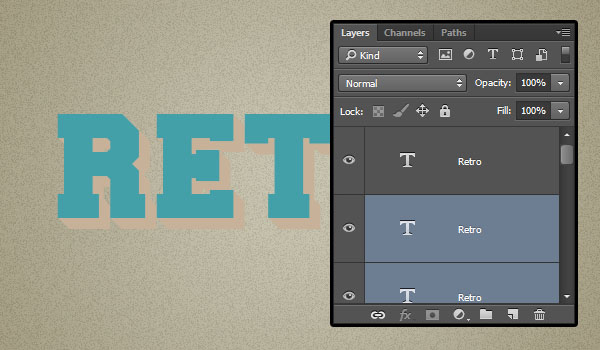
8、使用Freshman Normal字体创建一个全大写的文字,大小设定为125pt,颜色为#43a0a8,并设置字间距为视觉。

9、将文字图层创建一个副本,并移动到原图层下面。
10、选中文字副本图层,进入自由变换模式,编辑〉自由变换(MAC:Command-T,Windows:Ctrl+T),点击右箭头键一次,然后点击向下箭头键一次,将其向右和向下分别移动一个像素,然后确定。

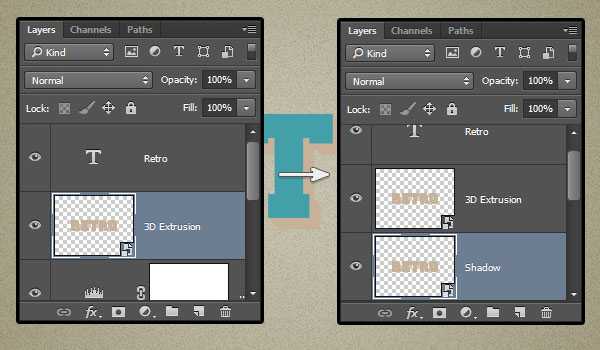
11、点击键盘Option+Command+Shift+T(Windows:Alt+Ctrl+Shift+T)组合键10次。
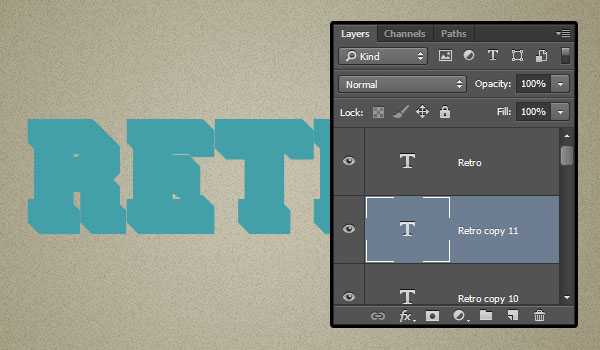
12、选择所有复制的文字图层,将它们的颜色设置为#c7b299。
13、选中刚复制的所有图层,将其转换为智能滤镜(滤镜)转换为智能滤镜),更名为3D_Extrusion。创建该图层的副本,拖动到下方,更名为Shadow。
上一页12 下一页 阅读全文
最终效果
1、新建一个800*600px文档,并将Background图层创建一个副本,将其命名为Background_copy。
2、双击Background_copy图层,勾选渐变叠加,并设定以下数值 勾选仿色复选框;样式:径向;缩放:150%;创建渐变,左边颜色为#c8c5b8,右边颜色为#aaa593。
3、将Background_copy图层创建一个副本,然后栅格化该图层,并命名为Background_copy_2。 如果你使用的Photoshop为CS6或者更早的版本,你需要点击图层编组(图层)图层编组),然后合并该组(图层)合并组)来代替。
设定前景色为#c8c5b8,背景色为#aaa593。
4、点击滤镜 〉杂色 〉添加杂色,调节数量为5,分布模式为平均分布,勾选单色复选框。
5、将Background_copy_2图层的混合模式改为变暗,这将为增强杂色在背景中的效果。
6、点击图层面板底部的创建新的填充或调整图层按钮,并选择色阶。
7、调整阴影值为72、伽玛值为1.05、高光为236,这将调节背景图层的着色。
8、使用Freshman Normal字体创建一个全大写的文字,大小设定为125pt,颜色为#43a0a8,并设置字间距为视觉。
9、将文字图层创建一个副本,并移动到原图层下面。
10、选中文字副本图层,进入自由变换模式,编辑〉自由变换(MAC:Command-T,Windows:Ctrl+T),点击右箭头键一次,然后点击向下箭头键一次,将其向右和向下分别移动一个像素,然后确定。
11、点击键盘Option+Command+Shift+T(Windows:Alt+Ctrl+Shift+T)组合键10次。
12、选择所有复制的文字图层,将它们的颜色设置为#c7b299。
13、选中刚复制的所有图层,将其转换为智能滤镜(滤镜)转换为智能滤镜),更名为3D_Extrusion。创建该图层的副本,拖动到下方,更名为Shadow。
上一页12 下一页 阅读全文
下一篇:PS制作超炫的星光字效