photoshop和AI绘制三维圣诞拐杖糖果条字体特效
平面设计 发布日期:2026/6/8 浏览次数:1
正在浏览:photoshop和AI绘制三维圣诞拐杖糖果条字体特效
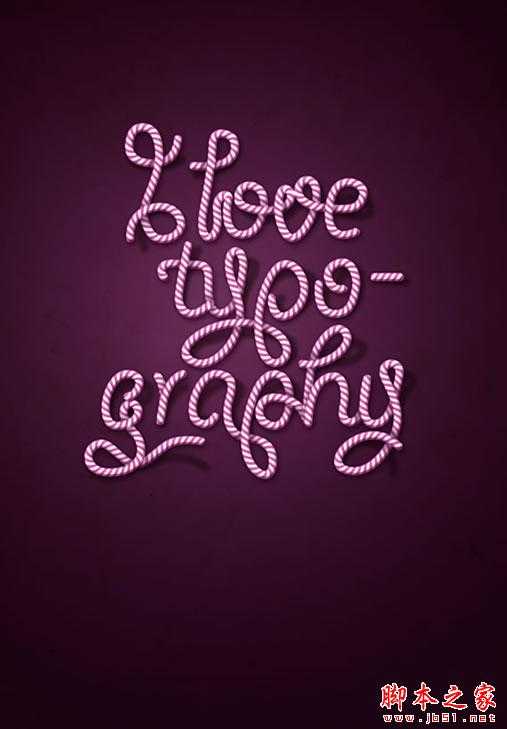
教程中,我们将使用Illustrator和Photoshop创建一个很棒的糖果条字体效果。
创建高级的矢量图案画笔
在Photoshop中订制混合模式
创建阴影和光线
润色照片以适应场景
创建适合图片的背景
使用调整图层
难度:中级-高级
完成时间:1小时
工具:Illustrator CS3,Photoshop CS3
资源:*** texture from bashcorpo(纸张纹理)
步骤1
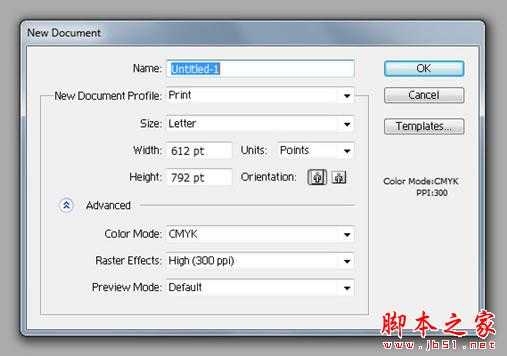
打开Illustrator,创建一个名为“Letter”的新文件,色彩模式设置为CMYK,72dpi。
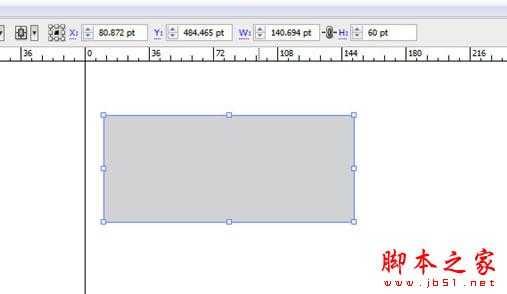
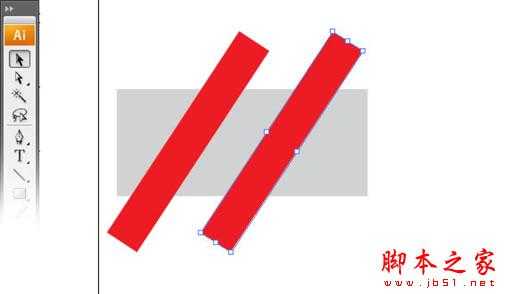
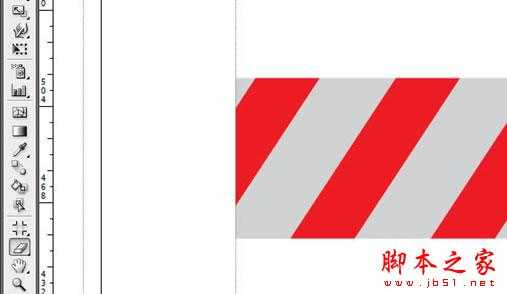
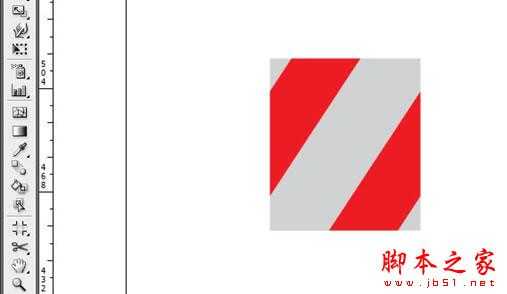
使用矩形工具(M),按下图画一个灰色的矩形。
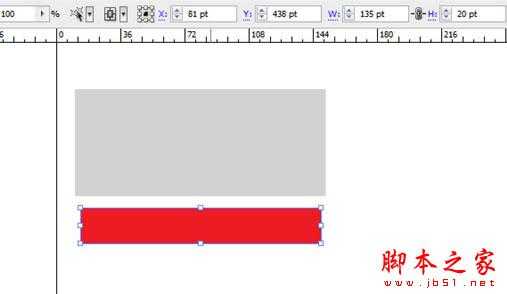
画另一个矩形,但要比之前的那个窄。改变它的颜色为红色或其它颜色以便区分。
使用选择工具(V),旋转第二个矩形(如图)。位置不需要非常精确,随着感觉走~

按住Alt键并点击拖动红色矩形移到右边。拖动时按住Shift键保持平行。
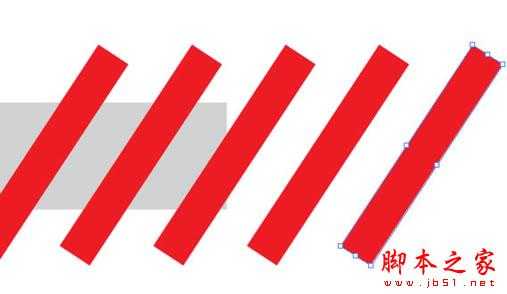
按CTRL+D三次。复制图形。
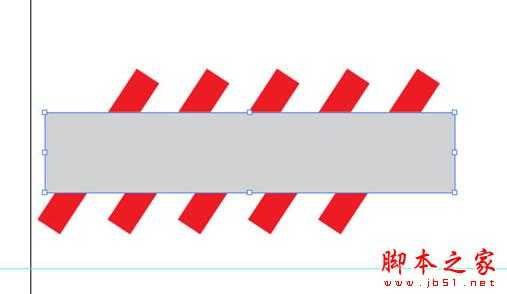
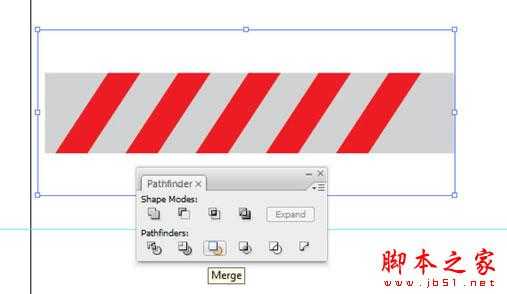
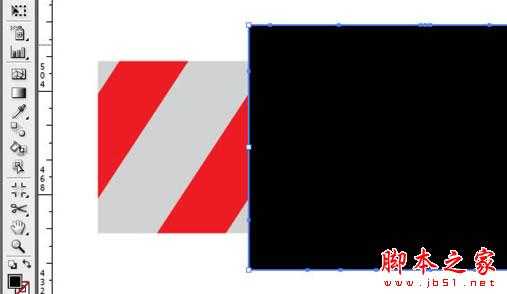
选择灰色矩形,延长它一点,将它复制(Ctrl + C)并粘贴到前面(Ctrl + F)。按CTRL + SHIFT + ]把它放在其他外形的前方。
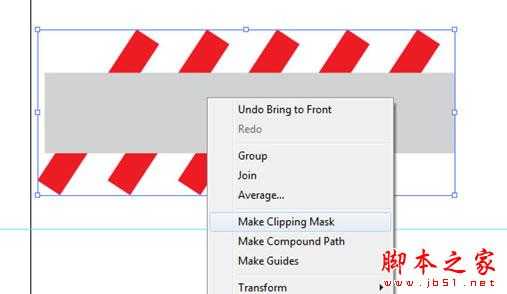
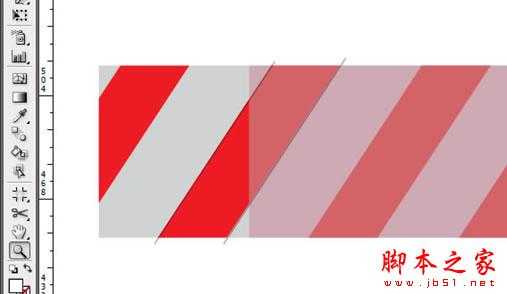
删除其填充,选择所有的红色长方形,右键单击》建立剪贴蒙版。选择所有物件(按Ctrl + A),点击合并按钮。然后把合并后的图形副本粘贴到前方(CTRL + C 》 Ctrl + F)。 使用橡皮擦工具(Shift + E),按住Alt键擦除左侧红色条纹的部分。
向右移动副本图形直到第一个红色条纹对齐到第二个条纹上,如下图。降低不透明度以便看得更清楚。现在选择上方的外形,并设置其
填充颜色为玄色。
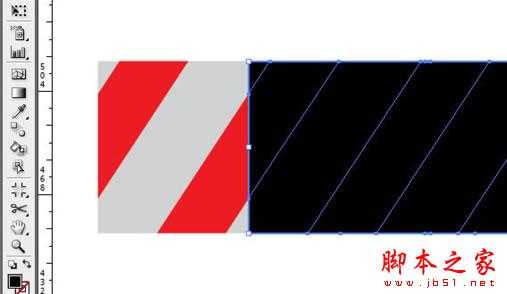
使用选择工具(V),选择玄色矩形,按住Alt键并单击拖动中间的变形点,如图。
在路径查找器窗口中(窗口》路径查找器),单击合并按钮。然后选择所有的物件,再次合并。使用直接选择工具(A),选择玄色矩形,点击删除。
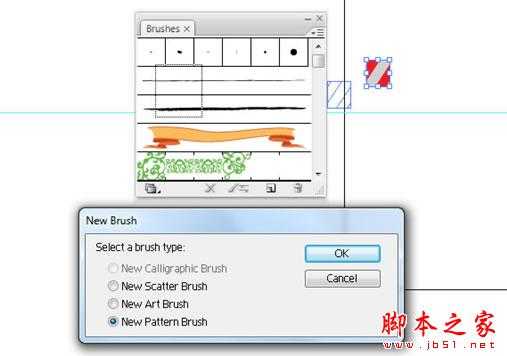
选择所有艺术品,点击拖动它到画笔面板(F7键),设置它为“图案画笔”。使用路径工具(P)绘制一条长的笔挺路径。然后点击你刚才创建的画笔。
使用椭圆工具(L),画一个圆圈。按住Shift键点击拖动,使之更完美。
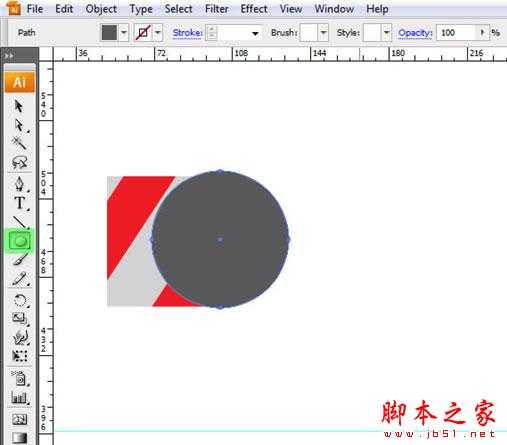
单击矩形外形,从顶部的菜单条复制高度值。选择圆形并在宽度和高度上粘贴此值。
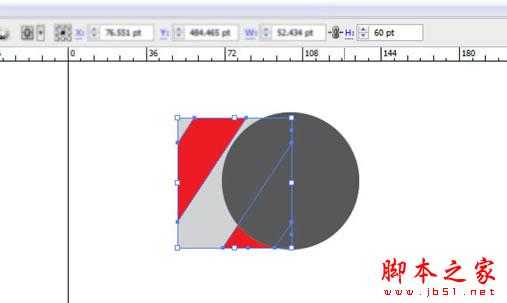
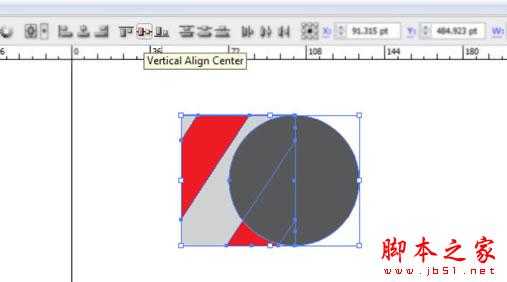
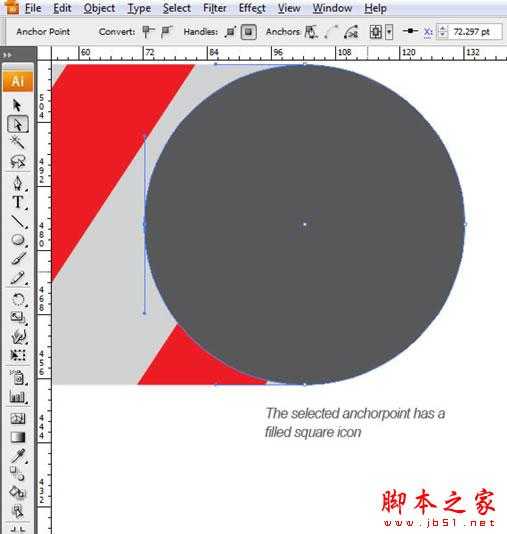
选择这两个外形,对齐它们的水平轴。按CTRL点击四周的区域取消,然后使用直接选择工具(A),选择圆圈的左侧锚点,点击删除。
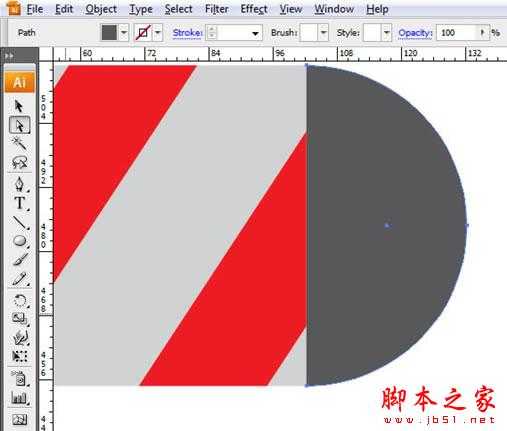
使用选择工具(V),按下图对齐外形。选择矩形,按ALT点击拖动来创建一个副本。 重新对齐副本,参照步骤9。
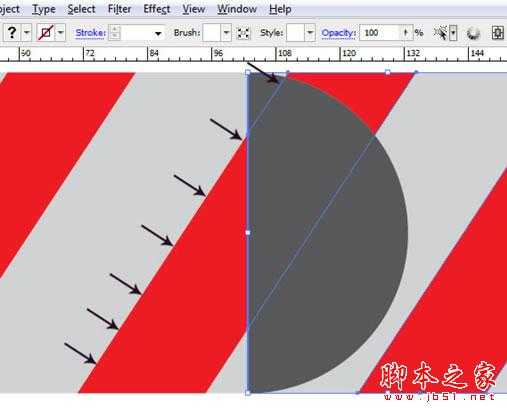
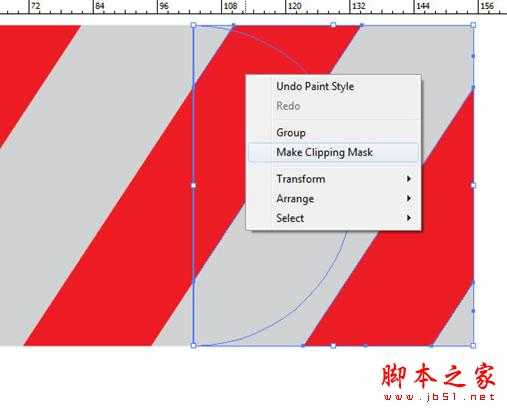
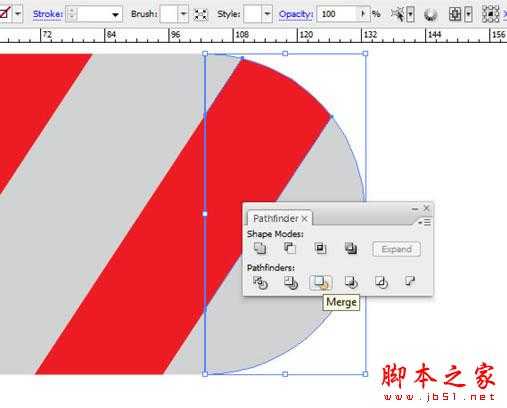
选择半个圆圈,删除其填充,按住Shift点击它后面的矩形。现在,右键单击》建立剪贴蒙版。在路径查找器窗口(窗口》路径查找器),单击合并按钮。
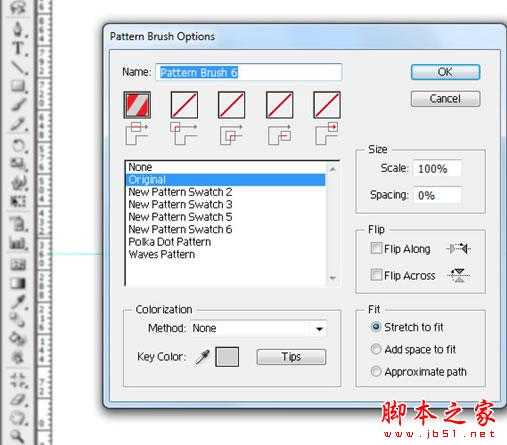
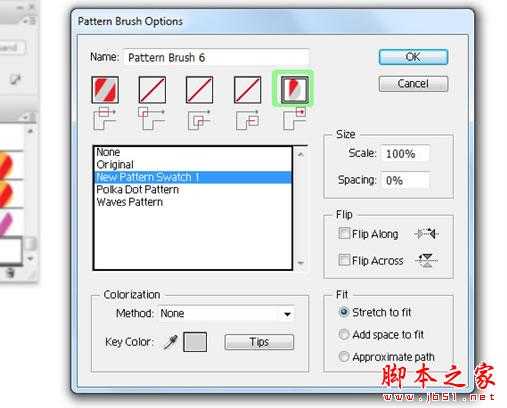
打开色板面板(窗口》色板),点击拖动天生的外形到面板里。命名为“candy-end”。在画笔面板中(F5键),选择我们的画笔。确保取消一切操纵(按Ctrl点击空缺区域)。
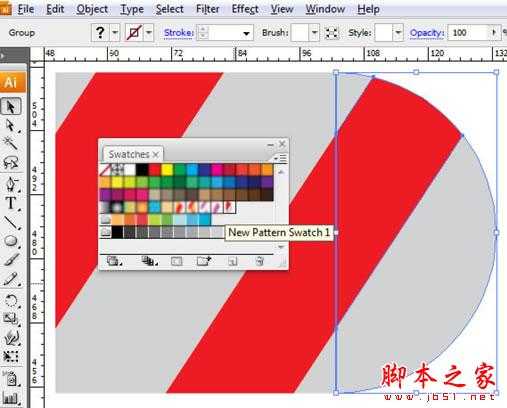
打开下拉菜单,选择选项。单击最后一个框,从列表中选择“candy-end”。点击确定。选择路径,再次点击一下笔刷。现在看看它的样子~

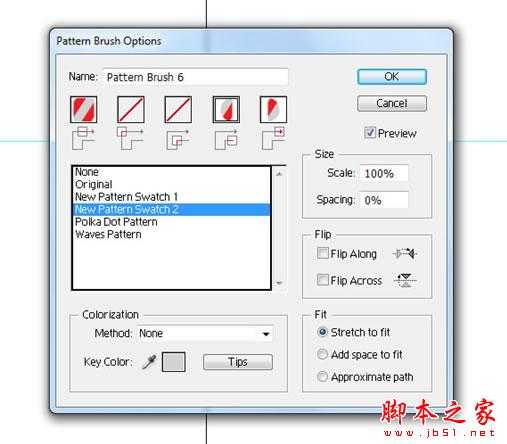
对另一末真个路径做相同的事。
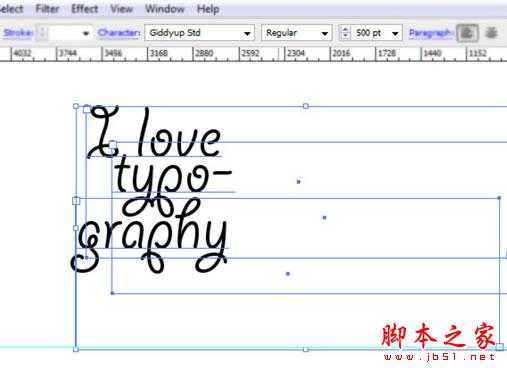
现在,让我们创建文本吧。我使用“Giddyup Std”字体作为参考。使用水平文字工具(T),输进下列文本。
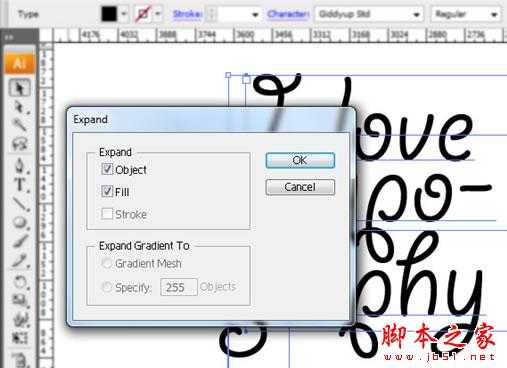
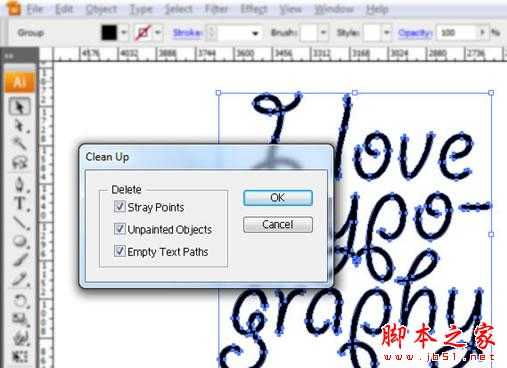
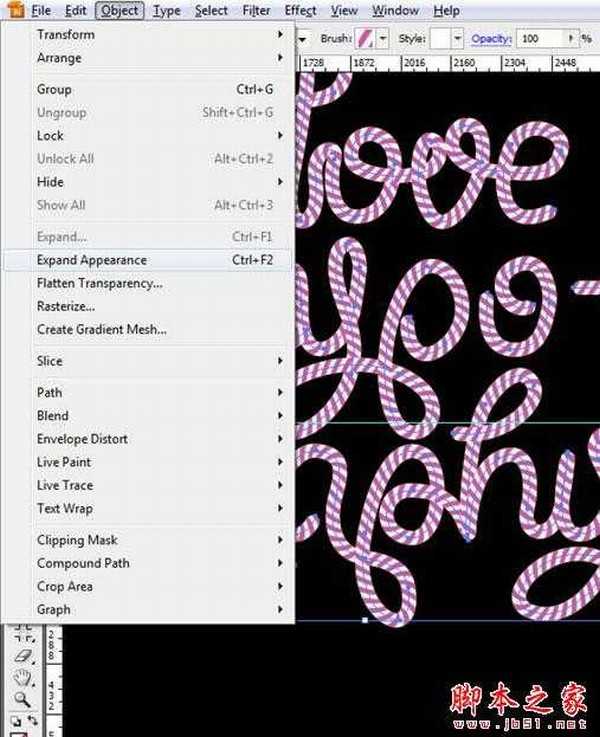
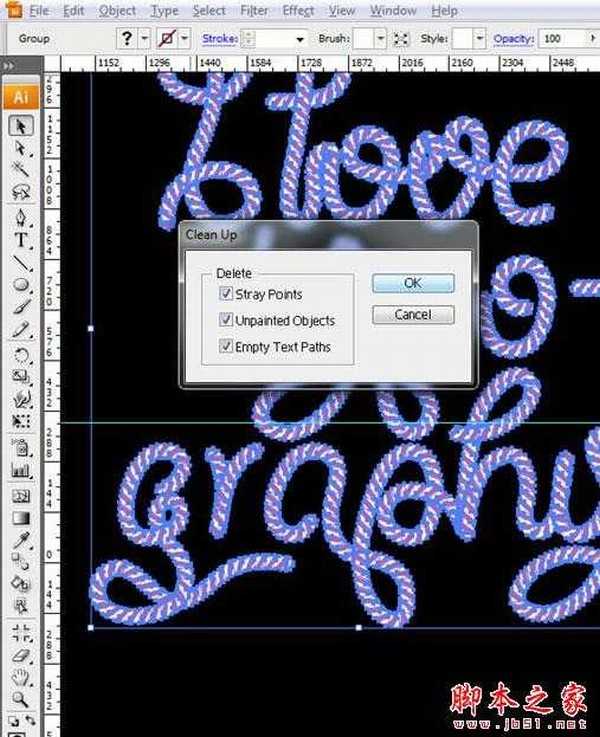
选择所有文字,往对象》扩展,然后往对象》路径》清理。
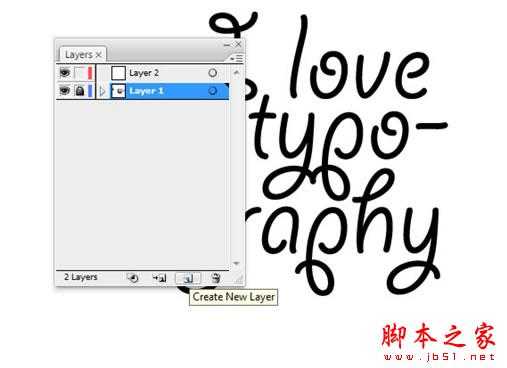
在图层面板中(F7键),点击“创建新图层”按钮,并锁定它下面的层。选择新创建的层。
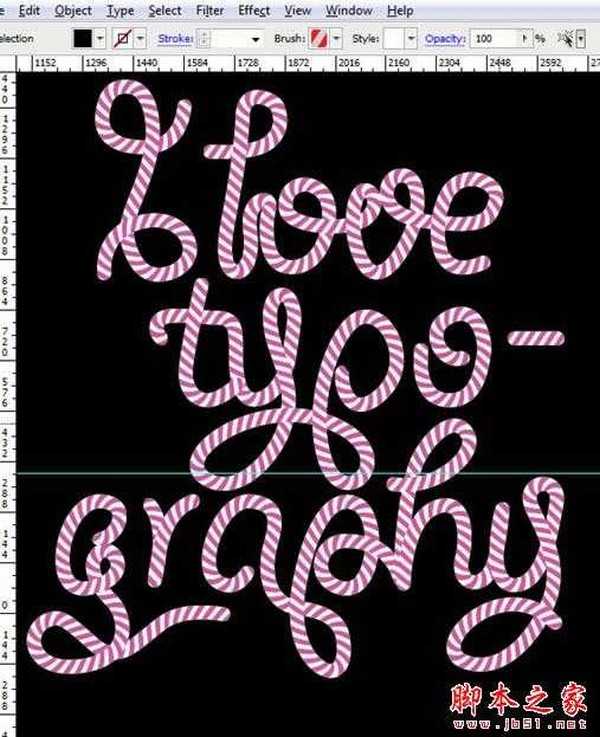
使用路径工具,追踪文本,但不完全遵循它,可以自由链接它们,增加循环和打结。 完成追踪后,选择所有路径。创意最重要!
留意:假如你想改变颜色,往创建的外形,改变其颜色,并创建一个新的画笔。我选择了亮粉色和灰色。玄色背景会更清楚,添加它。
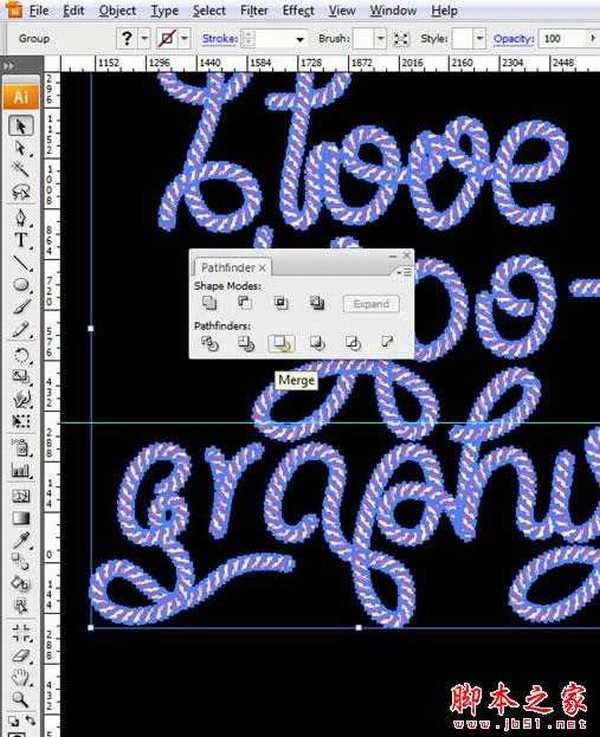
Ctrl+F2,然后往路径查找器窗口,点击“合并”,然后往对象》路径》清理。
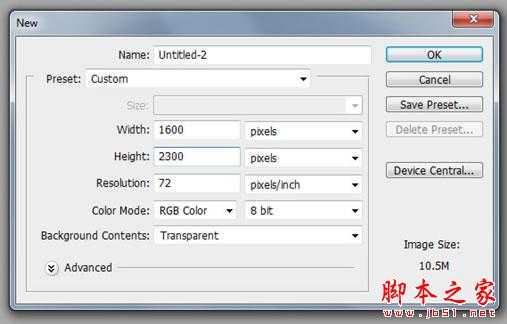
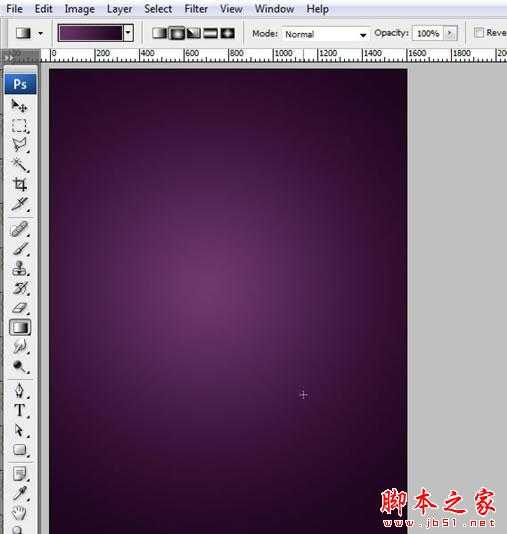
打开Photoshop,往文件》新建,创建一个72dpi的1600 × 2300像素,RGB色彩模式的新文件。
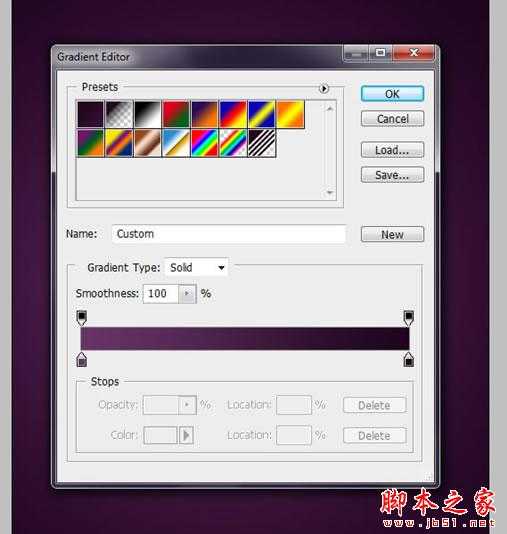
使用渐变工具(G),按下图对背景应用渐变。
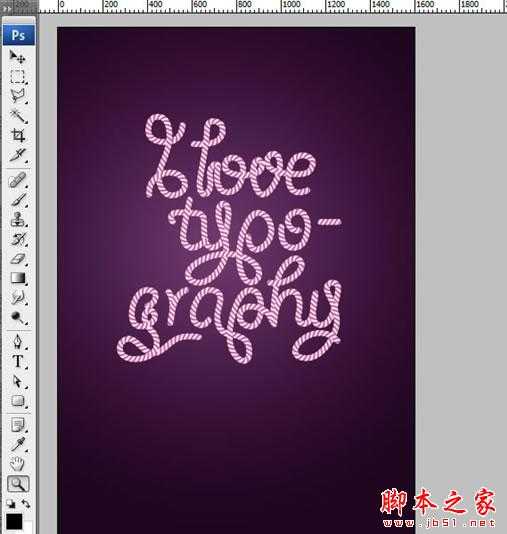
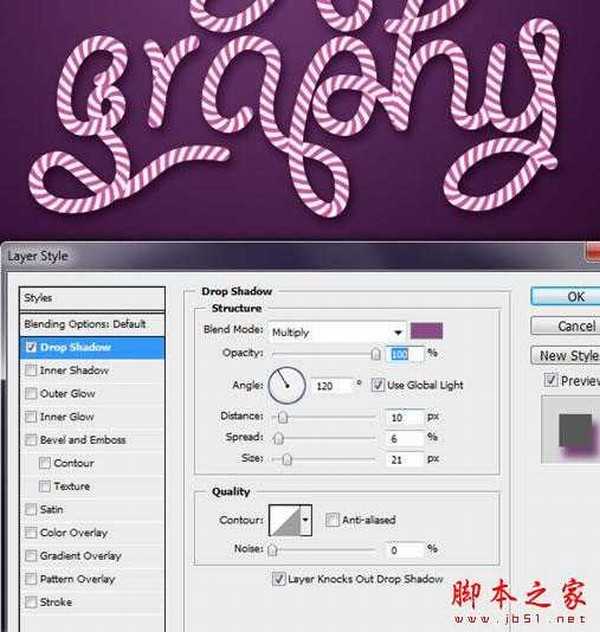
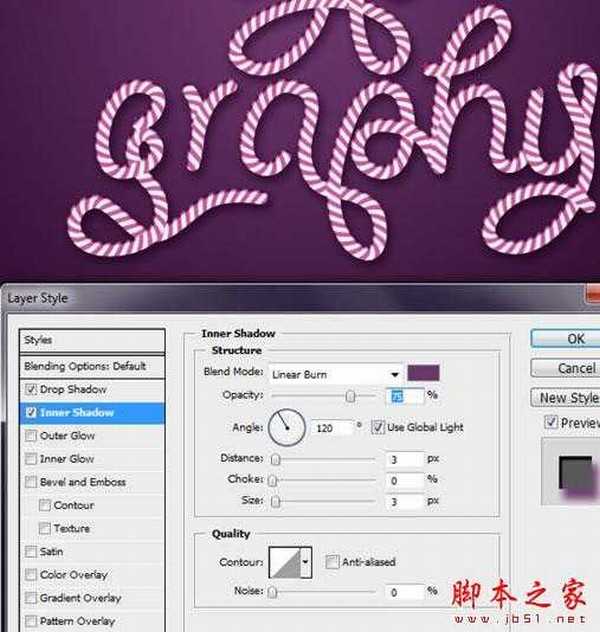
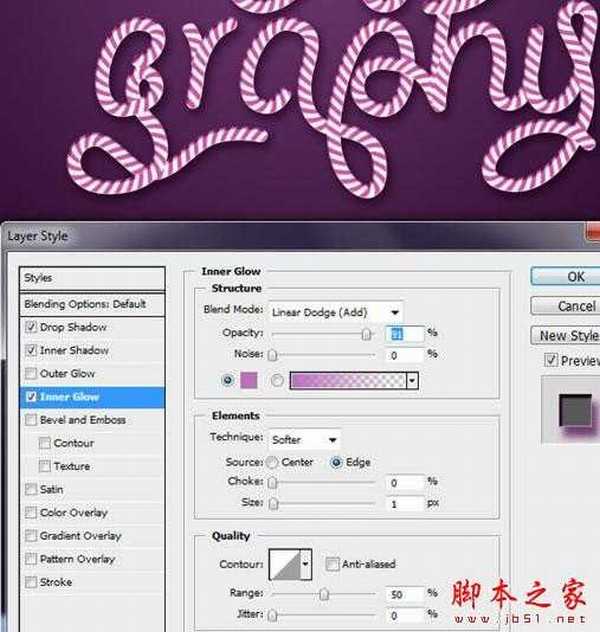
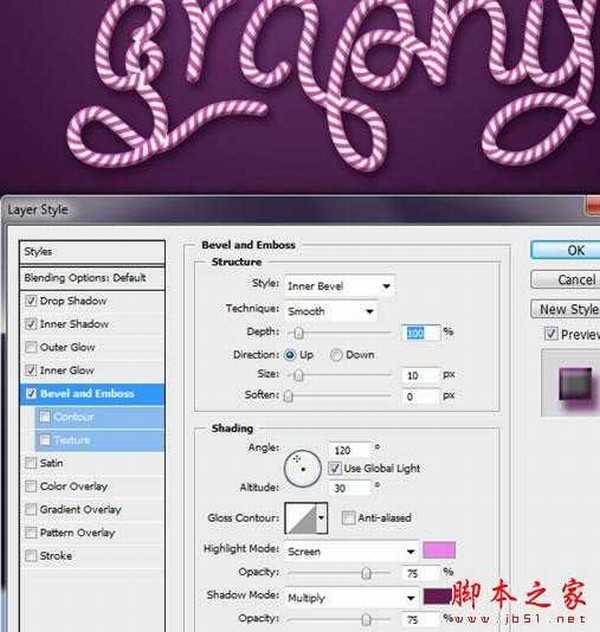
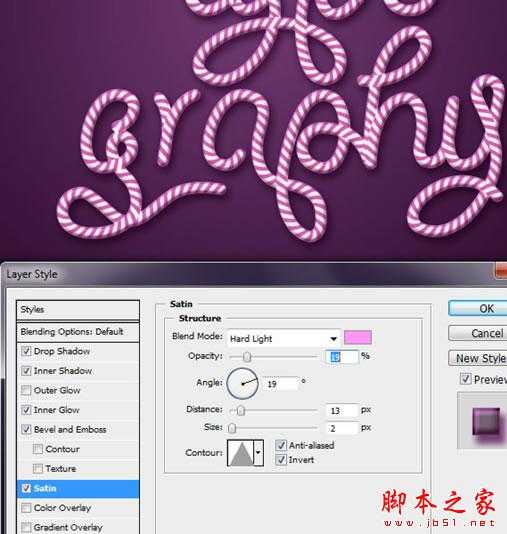
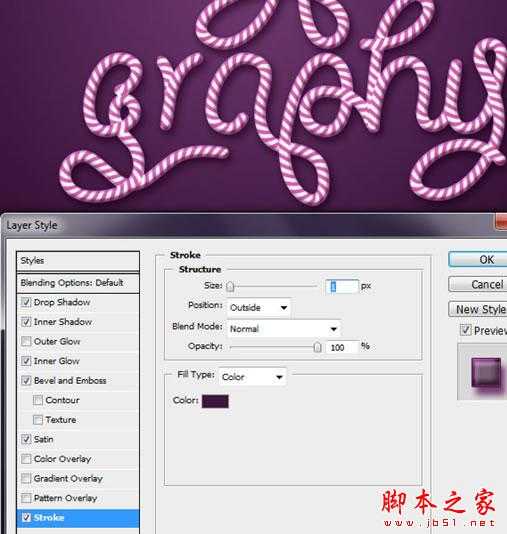
从Illustrator点击拖动矢量文本到Photoshop中,稍微调整它一点,然后点击回车。 右键点击图层略缩图,选择“栅格化图层”,然后点击“fx”按钮选择混合选项。使用以下设置。
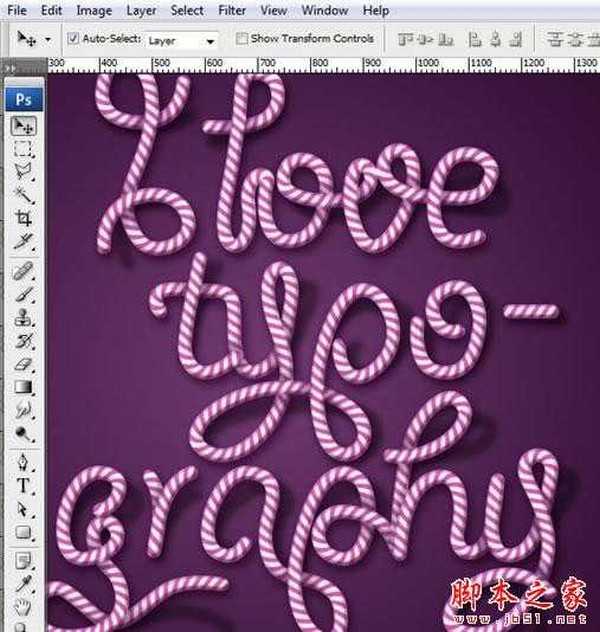
创建一个新层(Ctrl + Shift + N),混合模式设置为正片叠底,使用画笔工具(B),设置硬度为0%,删除画笔面板其他额外的设置,涂抹一些阴影给它一个更棒的立体效果。使用暗紫色。
提示:按Ctrl + 单击文字层,往图层》图层蒙版》显示全部。

创建一个新层(Ctrl + Shift + N),把它放在文本图层的下方,使用画笔工具(B),设置硬度为0%,删除画笔面板其他额外的设置,涂抹一些阴影,仿佛部分文字在墙上弯曲一样。
打开“*** texture”。选择全部(Ctrl + A),复制(Ctrl + C)并粘贴(Ctrl + V)到我们的文档中。把它放在背景层的上方。调整大小以适合画布,然后按回车键。设置混合模式为正片叠底。

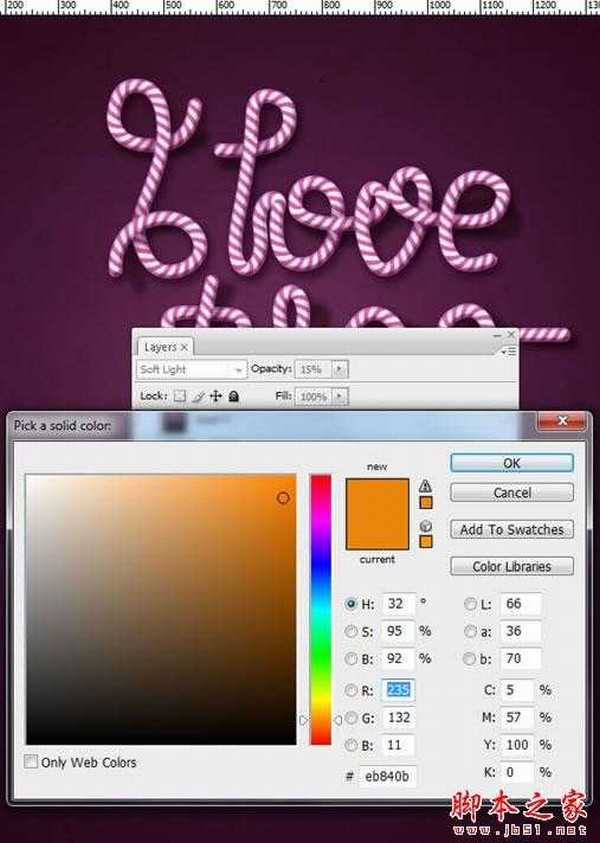
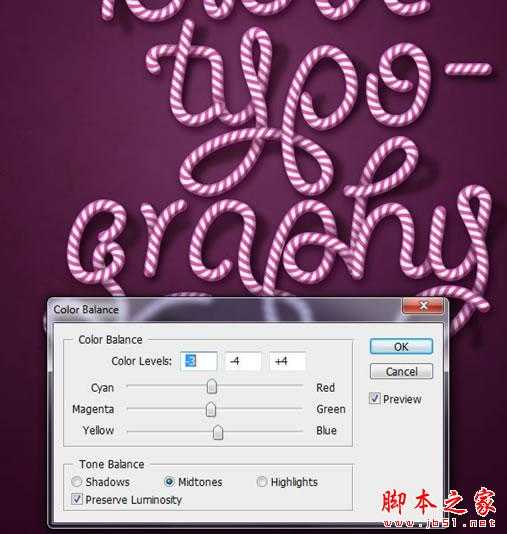
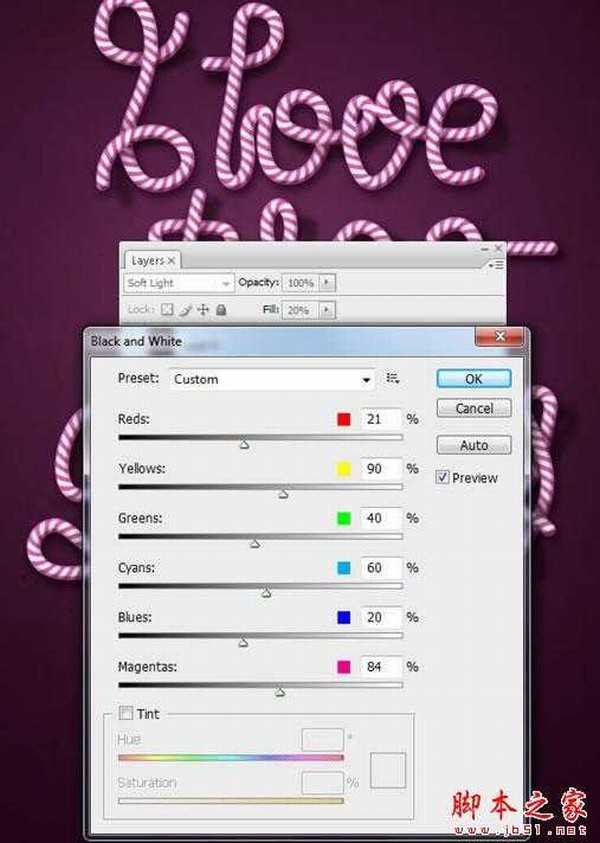
往图层》新建填充图层》纯色。..和图层》新建调整图层》色彩平衡,Black & White。使用下面的设置。
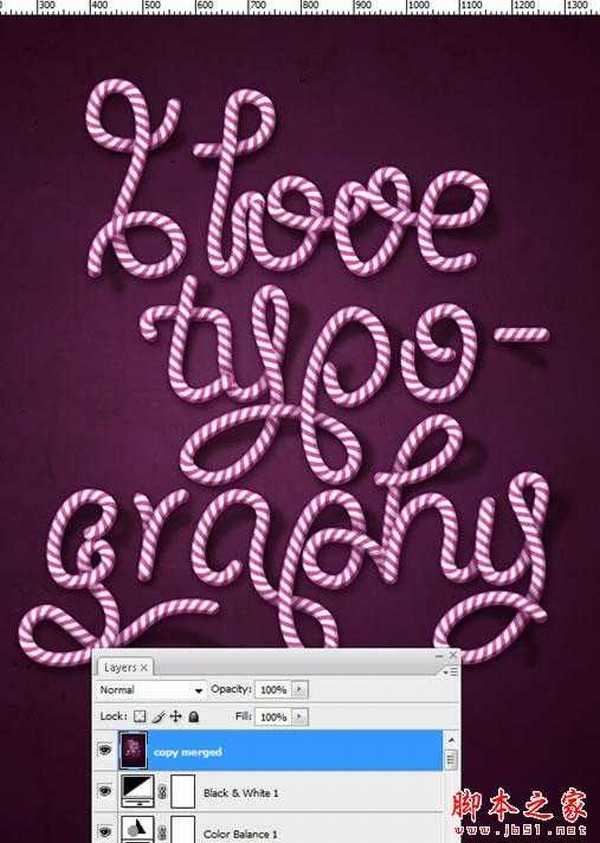
选择所有物件(Ctrl + A,复制合并(Ctrl + Shift + C)和粘贴。往滤镜》锐化》 USM锐化。点击OK。

创建高级的矢量图案画笔
在Photoshop中订制混合模式
创建阴影和光线
润色照片以适应场景
创建适合图片的背景
使用调整图层
难度:中级-高级
完成时间:1小时
工具:Illustrator CS3,Photoshop CS3
资源:*** texture from bashcorpo(纸张纹理)
步骤1
打开Illustrator,创建一个名为“Letter”的新文件,色彩模式设置为CMYK,72dpi。
使用矩形工具(M),按下图画一个灰色的矩形。
画另一个矩形,但要比之前的那个窄。改变它的颜色为红色或其它颜色以便区分。
使用选择工具(V),旋转第二个矩形(如图)。位置不需要非常精确,随着感觉走~
按住Alt键并点击拖动红色矩形移到右边。拖动时按住Shift键保持平行。
按CTRL+D三次。复制图形。
选择灰色矩形,延长它一点,将它复制(Ctrl + C)并粘贴到前面(Ctrl + F)。按CTRL + SHIFT + ]把它放在其他外形的前方。
删除其填充,选择所有的红色长方形,右键单击》建立剪贴蒙版。选择所有物件(按Ctrl + A),点击合并按钮。然后把合并后的图形副本粘贴到前方(CTRL + C 》 Ctrl + F)。 使用橡皮擦工具(Shift + E),按住Alt键擦除左侧红色条纹的部分。
向右移动副本图形直到第一个红色条纹对齐到第二个条纹上,如下图。降低不透明度以便看得更清楚。现在选择上方的外形,并设置其
填充颜色为玄色。
使用选择工具(V),选择玄色矩形,按住Alt键并单击拖动中间的变形点,如图。
在路径查找器窗口中(窗口》路径查找器),单击合并按钮。然后选择所有的物件,再次合并。使用直接选择工具(A),选择玄色矩形,点击删除。
选择所有艺术品,点击拖动它到画笔面板(F7键),设置它为“图案画笔”。使用路径工具(P)绘制一条长的笔挺路径。然后点击你刚才创建的画笔。
使用椭圆工具(L),画一个圆圈。按住Shift键点击拖动,使之更完美。
单击矩形外形,从顶部的菜单条复制高度值。选择圆形并在宽度和高度上粘贴此值。
选择这两个外形,对齐它们的水平轴。按CTRL点击四周的区域取消,然后使用直接选择工具(A),选择圆圈的左侧锚点,点击删除。
使用选择工具(V),按下图对齐外形。选择矩形,按ALT点击拖动来创建一个副本。 重新对齐副本,参照步骤9。
选择半个圆圈,删除其填充,按住Shift点击它后面的矩形。现在,右键单击》建立剪贴蒙版。在路径查找器窗口(窗口》路径查找器),单击合并按钮。
打开色板面板(窗口》色板),点击拖动天生的外形到面板里。命名为“candy-end”。在画笔面板中(F5键),选择我们的画笔。确保取消一切操纵(按Ctrl点击空缺区域)。
打开下拉菜单,选择选项。单击最后一个框,从列表中选择“candy-end”。点击确定。选择路径,再次点击一下笔刷。现在看看它的样子~
对另一末真个路径做相同的事。
现在,让我们创建文本吧。我使用“Giddyup Std”字体作为参考。使用水平文字工具(T),输进下列文本。
选择所有文字,往对象》扩展,然后往对象》路径》清理。
在图层面板中(F7键),点击“创建新图层”按钮,并锁定它下面的层。选择新创建的层。
使用路径工具,追踪文本,但不完全遵循它,可以自由链接它们,增加循环和打结。 完成追踪后,选择所有路径。创意最重要!
留意:假如你想改变颜色,往创建的外形,改变其颜色,并创建一个新的画笔。我选择了亮粉色和灰色。玄色背景会更清楚,添加它。
Ctrl+F2,然后往路径查找器窗口,点击“合并”,然后往对象》路径》清理。
打开Photoshop,往文件》新建,创建一个72dpi的1600 × 2300像素,RGB色彩模式的新文件。
使用渐变工具(G),按下图对背景应用渐变。
从Illustrator点击拖动矢量文本到Photoshop中,稍微调整它一点,然后点击回车。 右键点击图层略缩图,选择“栅格化图层”,然后点击“fx”按钮选择混合选项。使用以下设置。
创建一个新层(Ctrl + Shift + N),混合模式设置为正片叠底,使用画笔工具(B),设置硬度为0%,删除画笔面板其他额外的设置,涂抹一些阴影给它一个更棒的立体效果。使用暗紫色。
提示:按Ctrl + 单击文字层,往图层》图层蒙版》显示全部。
创建一个新层(Ctrl + Shift + N),把它放在文本图层的下方,使用画笔工具(B),设置硬度为0%,删除画笔面板其他额外的设置,涂抹一些阴影,仿佛部分文字在墙上弯曲一样。
打开“*** texture”。选择全部(Ctrl + A),复制(Ctrl + C)并粘贴(Ctrl + V)到我们的文档中。把它放在背景层的上方。调整大小以适合画布,然后按回车键。设置混合模式为正片叠底。
往图层》新建填充图层》纯色。..和图层》新建调整图层》色彩平衡,Black & White。使用下面的设置。
选择所有物件(Ctrl + A,复制合并(Ctrl + Shift + C)和粘贴。往滤镜》锐化》 USM锐化。点击OK。