Photoshop制作光感非常细腻的彩色水晶字
平面设计 发布日期:2026/6/20 浏览次数:1
正在浏览:Photoshop制作光感非常细腻的彩色水晶字
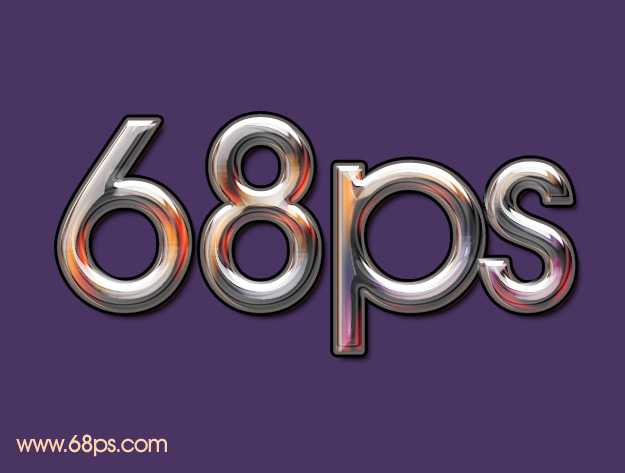
最终效果
1、新建一个800 * 600像素的稳定(大小也可以根据实际需要自定),背景填充颜色:#4A3462,效果如下图。

<图1>
2、把前景颜色设置为紫红色:#B9638F,选择文字工具,打上自己喜欢的文字或图形。这里使用的是英文字体:AvantGarde MD BT。喜欢的话可以去网上下载。

<图2>
3、现在来给文字添加图层样式。选择菜单:图层 > 图层样式 > 投影,具体参数设置如下图。混合的颜色为:#010101。其它数值可以根据文字的实际大小自行设置。
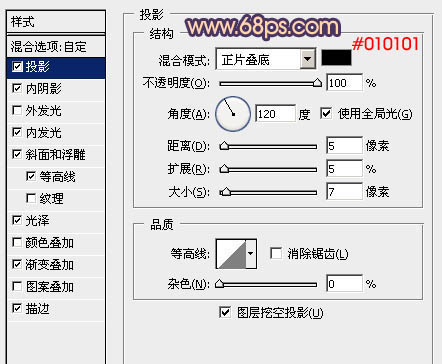
<图3>
内阴影:混合颜色:#010101,距离:0,阻塞:50%,大小:6像素,其它数值默认,如下图。
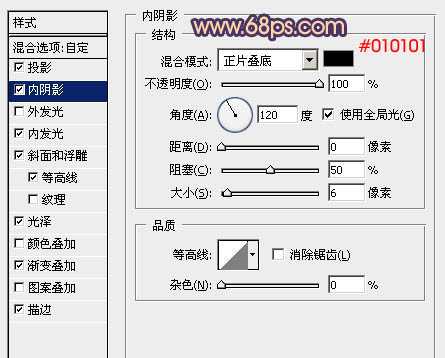
<图4>
内发光:不透明度设置为:100%,颜色设置为白色,其它参数设置如下图。
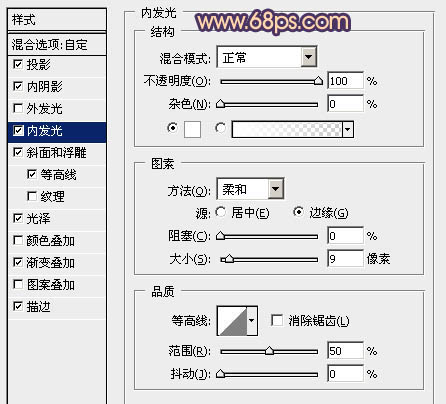
<图5>
斜面和浮雕:方法:雕刻清晰,方向:上,大小设置为最大,其它参数设置如下图。

<图6>
等高线:这一步设置比较重要,曲线需要自己调整,如下图。
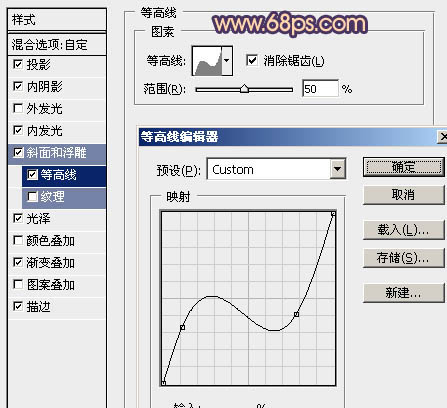
<图7>
光泽:颜色设置为:#010101,不透明度为:61,其它参数设置如下图。
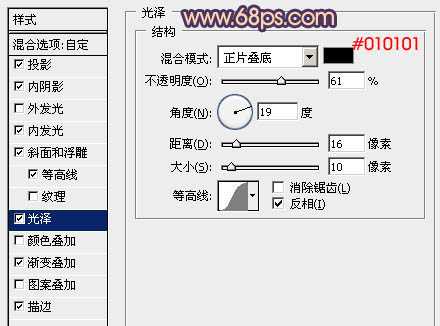
<图8>
渐变叠加:这一步的渐变颜色可以按照自己的喜欢设置。
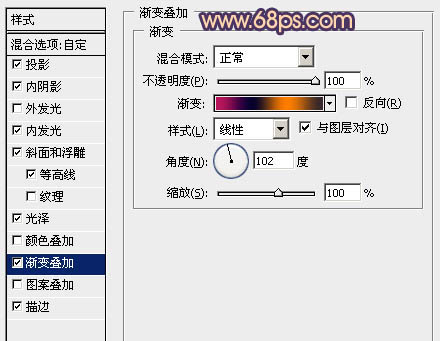
<图9>
<图10>
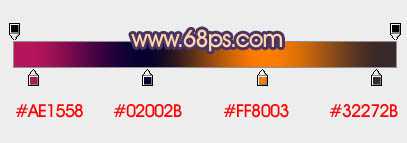
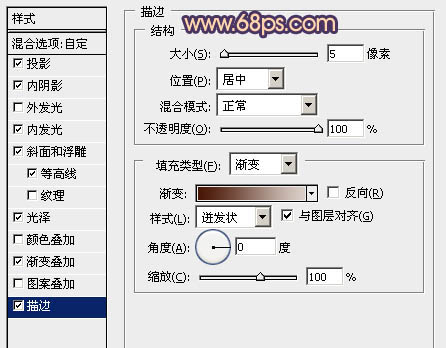
描边:大小设置为5像素,渐变颜色设置如图12。
<图11>
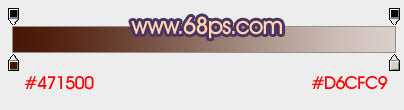
<图12>
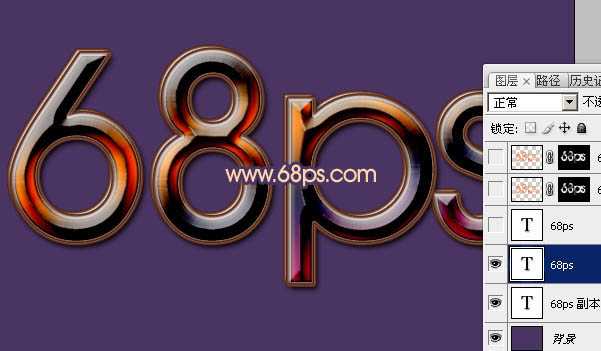
设置好图层样式后的效果如下图。如果有不满意的地方可以再把图层样式调出来,适当更改参数。

<图13>
4、把当前文字图层复制一层,把复制后的文字稍微向右下方移动几个像素,效果如下图。
<图14>
上一页12 下一页 阅读全文
1、新建一个800 * 600像素的稳定(大小也可以根据实际需要自定),背景填充颜色:#4A3462,效果如下图。
<图1>
2、把前景颜色设置为紫红色:#B9638F,选择文字工具,打上自己喜欢的文字或图形。这里使用的是英文字体:AvantGarde MD BT。喜欢的话可以去网上下载。
<图2>
3、现在来给文字添加图层样式。选择菜单:图层 > 图层样式 > 投影,具体参数设置如下图。混合的颜色为:#010101。其它数值可以根据文字的实际大小自行设置。
<图3>
内阴影:混合颜色:#010101,距离:0,阻塞:50%,大小:6像素,其它数值默认,如下图。
<图4>
内发光:不透明度设置为:100%,颜色设置为白色,其它参数设置如下图。
<图5>
斜面和浮雕:方法:雕刻清晰,方向:上,大小设置为最大,其它参数设置如下图。
<图6>
等高线:这一步设置比较重要,曲线需要自己调整,如下图。
<图7>
光泽:颜色设置为:#010101,不透明度为:61,其它参数设置如下图。
<图8>
渐变叠加:这一步的渐变颜色可以按照自己的喜欢设置。
<图9>
<图10>
描边:大小设置为5像素,渐变颜色设置如图12。
<图11>
<图12>
设置好图层样式后的效果如下图。如果有不满意的地方可以再把图层样式调出来,适当更改参数。
<图13>
4、把当前文字图层复制一层,把复制后的文字稍微向右下方移动几个像素,效果如下图。
<图14>
上一页12 下一页 阅读全文